Saturday

New Year's Resolutions (well, sort of)

This is my new year's resolution list for this year. I've wanted to do the bag projects for a very long time. I figured the best way to actually do them is to put them on my priority list and what better way than to call them a new year's resolution!


http://www.lieslmade.com/tutorials/2013/09/13/weekender-bag-tutorial-with-pattern


http://pinkxstitches.blogspot.com/2014/01/boxy-pouch-tutorial.html


http://www.ilovetomakequilts.com/182-day-solstice-challenge-blocks.html


http://noodle-head.com/2015/11/makers-tote-pattern.html


Farm Girl Vintage Sampler Quilt


Tula Pink 100 City Blocks (this is a very ambitious goal)


Friday

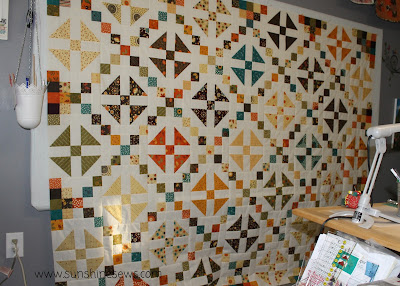
A Fall Quilt - WIP

I've been working on this quilt for some time now. It's one of those projects that gets worked on then put aside, then worked on then put aside... So I finally got this beauty to the point where I can actually quilt it! I made the backing from two coordinating prints. They were almost solids; just a little marbling effect in the fabrics made them a bit more interesting than regular solids. One print was a dark green and the other a nice warm orange.

Once I completed the backing, I ironed it flat before I spread it out to make the quilt sandwich. I realized that I was not all that fond of the dark green color. I decided to use it anyway since it was one of the colors that complimented the fabrics used on the front. It seemed too plain but I really thought that after some quilting, it might look more interesting.

After completing the quilting on the center section of the quilt, I looked at my work. Now I really hated that backing. So I let the quilt sit while preparing for Christmas.

A few days ago I decided to take another look at the quilting on the quilt. Still hated it. I decided it's time to rip it out. I think in the back of my mind I was already prepared to do it I just had to pull the trigger. So I started to rip on Monday.

I ripped on Tuesday.
And Wednesday.
Thursday my husband had a heart procedure so we spent the day at the hospital.
Today I finished ripping! Phew! It's all out and now I can start over with new backing.

Custom Sewing Table

Ever since I got my new sewing machine, my custom sewing table has been a little difficult to use. My old machine was recessed into the table. My new machine is much bigger than the old one so it doesn't quite fit in the opening.

My husband has the next two weeks off for Christmas break so he plans on completing some fun (fun for him anyways) projects. Today he decided to tackle getting my new machine to fit into the old space. I am so happy he has decided not to waste a single minute of his precious time off.

He took some measurements and started cutting away. Now I know it's pretty impossible to get it exact when working with a pre-existing hole in the table top, but he was bound and determined to make it work as best as possible.

He is definitely more of a perfectionist than me, I just want a workable space...don't really care what it looks like. He can do whatever is necessary to recess the machine into the table.

After hearing a lot of cutting, drilling and vacuuming, it was done. Jeff says I should use it for a few days and then let him know if he should do any adjusting. So far, I love it. I have to admit that I had a little trouble adjusting to it at first. I was reaching for the controls without looking at them and now that everything is lower, I was reaching too high.
I am so very lucky.

Thursday

Christmas Table Topper

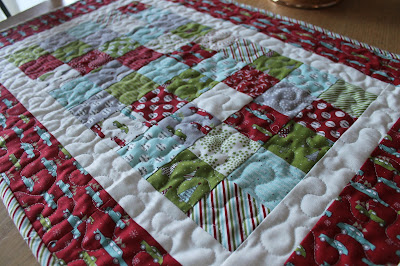
I wanted a new Christmas table topper for my kitchen table so I thought I would whip one up. I have some leftover 2 1/2-inch strips from another project and I love the fabric so much that I really want to use it.

I cut the strips into 2 1/2-inch squares and made a patchwork top. I made as many rows as I could with the fabric I had. I used some of the larger pieces that weren't cut into strips yet for the inner and outer borders and I used the scraps left after that for the back.

I found a scrap of batting from my stash and free-motion quilted it. I also dug out the leftover binding from the original project and used the rest here.

This is what I came up with:

Sweetwater Holly's Tree Farm Table Runner


Friday

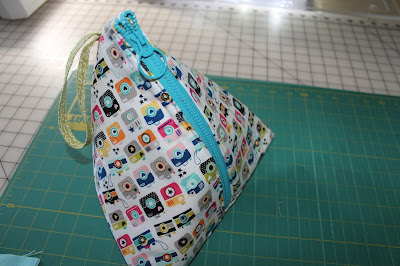
Pyramid Power Bag Class

Three weeks ago I took a class called Pyramid Power Gift Bags. We were to learn how to use a Jelly Bean zipper in a funky shaped bag. The instructor was a school teacher who does sewing classes as a side-job. She was a very pleasant instructor with the right demeanor and temperament to teach us old-lady-set-in-our-ways quilters. (OK maybe that's just me I'm talkin' about!)

I liked getting some good instruction on when to use which stabilizer and how to make bags have lots of body. In this project we used different weight stabilizers in both the outside of the bag and the lining. It never occurred to me to do both.

I chose not to use a Jelly Bean zipper but instead use a Jelly Freedom zipper, where you cut the zipper to your specific length then add the zipper pull later. We were supposed to cut the pieces prior to class but I did not do that because my fabric is directional. I did not want to end up cutting everything sideways, if that makes any sense. 

Since the class was small, I worried needlessly about taking up the instructor's time just to get my pieces cut. I cut them during the class then waited for instruction to install the zipper. The instructor showed me how the zipper goes in and I stitched it down. Once I had it installed and top-stitched in place, I sewed the rest of the seams to complete the project. Only there was a problem...

The fabric was directional! I got it cut in the right direction but when I put the zipper on, I did it upside-down. Arrrgghh...Even though it was my fault, I do wish the instructor would have taken notice and mentioned that the finishing seam directions mattered. Oh well...it was a learning experience for everyone.
Pyramid Zipper Pouch

Monday

Sweet Sundays Quilts

I sewed labels on the 15 quilts that are set to go to the VA Hospital tomorrow.

I made the labels using my printer and a piece of muslin fabric. It's an easy process where I just iron muslin on a piece of freezer paper, cut it to 8.5" x 11" and run it through my printer. I then peel the muslin off the freezer paper, iron the muslin to set the ink, then apply Heat N' Bond Lite to the back.

I used to try to put the Heat N' Bond on the muslin then run it through the printer but I found that sometimes the fabric jammed in the printer. When that happened, it was an expensive waste of the Heat N' Bond. And freezer paper can be used over and over again so that is definitely the cheaper thing to do.

So I ironed the labels on the quilts then using a zig-zag stitch, I sewed around each label. Done.

My husband's American Legion group will be delivering these to the veterans tomorrow night. My church group is so happy to be able to give these little gifts to them.

Sunday

Happiness is . . .

This is the view out of my patio door today. It's a good indicator that I made the right plan for the day. And that plan is to decorate the Christmas tree.

My husband put the tree up on Thursday evening. We knew a winter storm was coming over the weekend so it made sense to get the tree into the house before the snow flies.

Yesterday he put the lights on the tree and it is ready to be decorated today. And what better time than to do it than during the Packers game while we watch the snow come down!

Happiness is . . . being home-bound for the day.

Wednesday

Tonka Truck Quilt - Completed

I free-motion quilted this baby quilt for a friend. She made this quilt to give as a Christmas gift so I had to make sure to get it done pretty quickly.

I was happy that I stocked up on Warm N' Natural cotton batting last month for just these kinds of things.

I used a nice yellow variegated thread on the back and I would have taken a photograph of it but the black and white striped fabric is very hard to look at. I used a larger meander to imitate the roads on the fabric print. I love the whimsy and the colors in this baby quilt.

Monday

Poppy Bag

I made this book bag using the measurement I found from a free online tutorial. I would post the link here but I can't seem to find it anymore. But I promise that all I used were the measurements of the main bag, the rest was all me.

I made an exterior pocket on this bag and some interior ones as well. I also added a zipper closure. I liked the measurements because they fit a file folder and I plan on using the bag for my Legion paperwork.

I am on the board of directors for Unit 434 of the American Legion Auxiliary and it's best to keep thing organized. I picked up the fabric for this bag because of the pretty poppy pattern. Poppies are a central "theme" for the Women's Auxiliary so it made sense to use them in this project.

Thursday

What's on the design board?

Batik Fabrics
I used a pattern called Strips and Ladders to make this lap quilt top.

The pattern is not an easy one to follow but with a little maneuvering, I got to this point.

I used a fat quarter bundle made up of some pretty green, blue and purple batiks. I have never used batiks before; I'm not all that fond of them. I do have to admit that they are easy to work with since there's no right or wrong side and the process they go through to dye them makes the fabrics a little stiffer which makes cutting more accurate.

After moving the blocks around on the design board a bit, I came up with this layout. I made these blocks in 1 day. Such a quick quilt to do.

Tuesday

Pokemon Pillowcase

My daughter bought some Pokemon fabric for my granddaughter Chloe. Chloe asked her mother to make her a pillowcase out of it. Of course, her mother promised her she would make it for her.

Then a few days went by.

Yesterday Chloe came over with her mother and had the fabric in her hand. I asked her why she had it and stated that I thought her mother was making her a pillowcase. Chloe proceeded to ask me to make it for her.

I looked at my daughter kind of puzzled and my daughter's response was that Chloe knew if she wanted it done soon, she better ask me.

That is one smart 6-year old.

So I promised her that I would finish it for her but she had to give me a day to get it done.

I had only made one pillowcase before and it was from a Sweetwater kit. I wasn't sure what the dimensions should be so I thought I would look it up. I remembered one of my sewing friends mentioning a technique that finished all the edges neatly called the burrito technique.  I had to give it a try.

The technique is very easy to do. The flange was pinned to the cuff, then the main fabric pinned to the edge of the cuff as well. Then the main fabric gets rolled up, the opposite end of the cuff is pulled up over the main fabric (like a burrito) and pinned to make a tube. You just stitch it all together then pull the rolled up fabric out of the end of the tube and viola! Then you fold the whole thing in half and stitch the edges. It literally took less than 15 minutes to make. I seriously think it took me longer to read the instructions than to actually make it.

I see many more of these in my future.


Saturday

Homemade Christmas Ornament

I made this ornament from a toddler-sized t-shirt. The 'Joy' under the tree on the shirt was kept as part of the ornament on purpose since that's also the name of the girl who wore the shirt and she will receive the ornament.  I added a nice green ribbon to hang the ornament and it really does match even though my camera did not do it justice.

Friday

Black Friday Deals

I went to the Jo-Ann Fabrics Black Friday Sale at 6 this morning. I really did not plan on going but I couldn't sleep.

I decided that 70% off flannel was a worth-while shopping trip. Since we have a large Jo-Ann's to the west of us, the one east of my home doesn't get much traffic. So even though it is a smaller store, I am happy to head east where there should be shorter lines.

I got to the store at 5 minutes after 6. There was plenty of parking and many available carts. And there wasn't even a line at the cutting table! I was in heaven. I could leisurely walk all the store aisles and take my time getting around. I even had 3 people all cutting my fabric selections. I asked why it was so quiet and they said they expected the real rush to occur tomorrow when all the fleece is 70% off. I hate fleece so I didn't care about that so good for me that I got a quiet day.

Since I felt little stress to get into a long line I ended up purchasing more than I planned on. I found t-shirts priced 5 for $10 so I got my granddaughter the rainbow of shirts for all those spirit days at school where they want the kids to wear a specific color. She will now have that covered. And I found the most adorable 2017 planning calendar so with an extra 25% off the sale price, I could not resist.

The sale included quilting supplies at 60% off which is so rare I got a rotating cutting mat and a large ruler that I always wanted. So Merry Christmas to me!

Wednesday

Blessing of the Quilts

We had our annual blessing of the quilts at church tonight. I love how it is incorporated into the "Thanksgiving Eve" service. At a time when we are giving thanks, we are grateful that we can offer these quilts to local charities for distribution.

Some will go to our local homeless shelter, some will go to the VA hospital and some we will save for our church family in time of need.

We have a small group of ladies from our church who help out. Many cannot sew, but they can pin the quilt layers and add yarn ties to complete the quilts. It is definitely a project that includes many hands and are given with love each year.

The leader of our group, Judy was present with her children and I couldn't resist snapping this picture of her. I am so happy to call her my friend.

Sunday

Tutto Sewing Tote For Sale

I want to sell my Tutto sewing tote. It is a very expensive item and I am hoping to get back half of what it is worth.

I bought it when I was taking my embroidery machine to sew days and classes. It is a big machine and it needed an extra-large tote.

The Tutto products are such high-quality totes that I absolutely love it. It has all the little nooks and crannies necessary to tote all my sewing needs besides the machine. The bag is even designed to keep the machine secure within the bag so if the bag gets jostled, there are no worries.

Now I have a second sewing machine I bought just for taking to classes and sew days. It is a small machine, the Janome Jem which weighs in at under 12 pounds. I really needed it since my back surgeries because I cannot lift or pull my big machine around anymore. So I really want to get a smaller Tutto sewing tote. I think about posting the bag on eBay but I fear the shipping costs will turn people off even though it does fold up flat.

Right now it's posted on CraigsList with no inquiries after a few days. I am hoping I get an offer soon!

Thursday

Sock Monkey Quilt - Completed

This is a cute baby quilt that I quilted for a friend. The quilt uses the Monkey Business fabric line and it is made up of half-square triangles and 5-inch squares.

I free-motioned quilted this one using a variegated gray thread on the top and a solid gray sulky on the back. I just love how the sulky gives a depth to the quilting.

I just wish I would have taken a photo of it before I delivered the quilt to its owner.

Monday

Badger Quilt - Completed

Today I finished quilting this quilt for a friend. She loves to work with the pinwheel block and this is a very cool way to use the Badger fabric as focus blocks with the pinwheel blocks as accents.

The quilt is a lap-sized version and the backing is done with the black/white pindot fabric like the stuff used in the pinwheels.

I wasn't sure whether to use red thread on the top or white and after quilting a small space with the red I decided I really liked it and used it over the entire top.

Thursday

Row Houses Quilt - Completed

Quilts for Scrap LoversI finished my Row Houses Quilt today. I used a variety of modern fabric scraps to make the houses for this quilt.

I used shades of gray and beige to make the "skies" for the backgrounds. This quilt is entirely appliqued. The houses are stitched together in rows then the rows are appliqued to the background.

It was great fun to choose the different backgrounds as well as the scraps for the houses.

For the quilting, I chose to try something new. I bought a stencil at the last quilt show I attended and used that as a guide for free-motion quilting. The stencil I bought has swirls on it and I wanted to use it to represent wind blowing over the houses. It was great fun to try this new technique. It felt a little more artsy than what I am used to doing.

I definitely need more practice, but I figure that I have to start somewhere. I can't get better at this unless I get practice so I will call this my first practice quilt using stencils.

I used some of the leftover fabrics to piece the back together. I like the continuity of using some of the same fabrics to make the back, but the truth is that I didn't have enough of the fabric I chose to make the back and it was a good way to not have to buy more fabric.

I took photos of the quilt on a blustery day. It was an unusual 70 degrees out but a little windy so my granddaughter enjoyed helping me keep the edges of the quilt down while I took pictures. She's just 4 years old and absolutely loves helping out. It was such a delight spending time with her outside while we took photographs.

The pattern for this quilt came from the book, Quilts for Scrap Lovers by Judy Gauthier. The neat thing about this book is that I know Judy. She is a wonderful woman who owns a quilt shop in Wisconsin. I got to know her when she started a modern quilt club near my neighborhood. It's a fun group of ladies and I enjoy our meetings together. Judy has moved on from the club due to her many other commitments, but I still get to see her at quilt shows and of course at her shop. I think I should get her to autograph my copy of her book!


Tuesday

Shopkins Pillow Cover

My granddaughter, Avery just loves her Shopkins. I made her a little bag to hold her little toy Shopkins a few weeks ago and she asked me to make her a pillow out of the leftover fabric. The amount of fabric left was a pretty small amount which meant another trip to the fabric store for more. So I got another half-yard of the trade-marked fabric and whipped this up for her. It's amazing how these little things bring her so much joy and that only makes it that much easier to want to keep making them for her.

Saturday

A Finished Free-Motion Quilting Table Runner Project

I free-motion quilted this pretty table runner for a client today. It was a quick little project and I really enjoy getting to work on these.

I chose a beige thread for the top and a burgundy thread for the bottom. I am getting lots of practice through these opportunities and I think I am getting better at it.

I look forward to delivering the finished project to Mary; she does beautiful work.


Tuesday

What's on the design board?

Sandy Gervais Grand Finale Fabrics
Here is my Shoo-Fly quilt work in progress. It is so large it does not fit on the design board. It will measure 84" x 104" when completed.

I am in the process of piecing the back together. It will take some strength and planning to quilt something this large. For me, it's a real physical challenge.

I do look forward to completing this beauty and it was great fun to put it together.

Wednesday

Row Houses Quilt - WIP

This is my row houses quilt. It is a work in progress. I started it during the summer and since I really took most of the summer off, I'm just getting back to it. It was an unusual quilt top to make for me. The rows of houses are done with applique which is not a technique that I enjoy. Or at least I thought I would not enjoy.

As it turns out, this was a lot of fun to make. Each row is stitched on using a variety of fancy stitches from my machine. I got to experiment with different stitches. Since my machine is very new to me, I haven't used any of them before!

Now I am going to experiment with the quilting process by using a stencil to free motion "wind" in the sky sections of the quilt. That is, as soon as I finish putting the back together. Now that I am getting back in gear when it comes to my sewing, I hope to be finishing this up within the next few weeks. Yay!

I must comment on the weather. It is the end of October and the grass is very green and all the flowers and shrubs are still greener than ever. What a wonderful fall it has been. We are constantly in the high 60's and it will be near 70 next week. The hammock gets tons of use. Amazing.

Friday

Client Baby Quilt Project

I free-motion quilted this baby quilt for a client today. The fabrics she used in this quilt are quite charming. It sure is a cheery quilt.

The quilt is made using the rail fence pattern with some patchwork worked into it and it is easy to put together. Usually it is made with strips but I suspect that there were pieces from previous projects thrown in to give it a nice scrappy look.

I had fun quilting this little gem.

Tuesday

A Fall Quilt - WIP

I'm finally getting some quality time in my sewing room. I've been enjoying our wonderfully warm fall weather and spend as much time doing outdoor projects as possible. But it's raining today so I'm not going to waste a minute doing anything but sewing.

The project on the table is a fall quilt and I can't wait to complete all the blocks. There are 4 different block patterns and I've finished 2 so far.

My little helper has always loved spending time with me in here. He has become very comfortable on this table. I think the vibration from the machine sometimes puts him to sleep. Or it's just that he is a cat and sleeps all the time anyway.

Saturday

My Finished Painted Light Fixture (and Ceiling Fan)

I finally finished spray-painting my ceiling fan. I actually painted the light fixture a while back. The polished nickel color turned out great on the fixture. There were so many little parts to paint that it took a long time because of all the painting-drying-turning-painting-drying...to get all the nooks and crannies covered.

All that was left were the fan blades. I painted those with a matte white earlier this week. Once that was completed, my husband installed it back in its place. He put the old light bulbs back in and I didn't like the look. So we went shopping for new bulbs. We bought some small bulbs that looked like flood light bulbs. And that made all the difference.

Thursday

Metal Thread Holder from Massdrop

I found this really awesome thread holder on massdrop.com. It was my first time using the website. It's a unique buying experience because you have to commit to purchase an item when it hits a certain low price. As more people commit to buying an item, the lower the price will go. So I pulled the trigger on this really cool thread holder.

Once the item hits the price you're willing to pay, they take the money from whatever purchase method you use. I used my Visa card to make the purchase. The thing is that even though massdrop takes the money, you still have to wait for the order to be placed. That doesn't happen immediately. It's a long process from committal-to payment-to delivery. I paid for the item in early September and it was just delivered yesterday. That's a long time.

Anyhow it was worth the wait. This is a hand-crafted thread holder made by a welder from heavy metals. It is so solid that I can guarantee it won't tip or move while in use. And it is so very pretty! It is definitely a great addition to my sewing room.

I am not sure I will use massdrop again any time soon but I am very happy with the results of this first purchase.

Sunday

Painting Project - Bookcase & DVD Rack

This bookcase was made by my husband a very long time ago. When our kids were young, he made each one of them a bookcase.

Our daughter, Jennifer still has hers, our son, BJ left his here with us and our other daughter, Bailee gave hers to her daughters. This is Bailee's bookcase. It was painted white and she wanted it updated. So I painted it a nice light purple and if you look closely, there are white flowers stenciled on it.

I painted my granddaughter's dvd rack the same color and stenciled that as well. They should compliment the girl's bedroom nicely.

Wednesday

Painting Project - Dresser

I painted my daughter's dresser this nice sage green color. It was leftover paint from another project. The dresser was originally white and loaded with scuffs from years of wear and tear. It's amazing how a little paint can turn something old into something new again.

Saturday

What's on the design board?

My design board is currently empty. Why? Well it just happens that things are moving so fast around here. Last month my daughter moved into a new apartment a block away from my home. I am so excited to have her and my granddaughters so so close to me. The thing is though, this move has sucked up all my time.

I work two days a week so that takes up some of my time but the rest of my time is spent helping everyone get settled in. So that means walking Chloe to the bus in the morning, picking up the girls from daycare some days and helping any way we can to make the new transition easier.

I also recently updated my kitchen and one of the things I didn't like was the ceiling fan. So I spray painted the light fixture and the fan blades. I prefer re-purposing things to buying new and I do love the light fixture so it was an easy decision to update the colors.

Since I set up the garage for painting, I thought I would paint an old nightstand that's been in the garage for a few years. I also painted my daughter's dresser and my granddaughter's bookcase and dvd stand. The weather has been unusually warm for late September so I wanted to take advantage of every single day of this nice weather while I still can do things outside.

I've spent so little time in my sewing room but I'm certainly using my time wisely and productively.