Saturday

Aiming for Accuracy Quilt Project Completed

Quilting Gallery Quilt Along
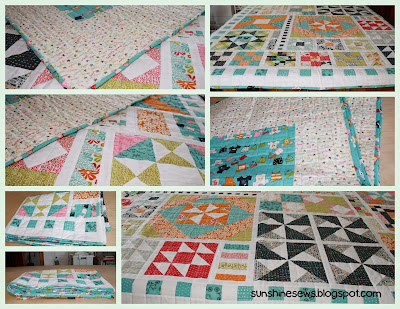
Aiming for Accuracy Quilt Along Quilt
I joined in a quilt-along this summer and I actually completed all the lessons on time...well almost all of them.  I got to the very last border, a simple strip of Kona white and I just stopped working on it.  I had an obligation to finish another quilt project so I put it down.

When I put things down the momentum to finish just disappears.  With craft fair season and the holiday season coming, I had plenty of good arguments for putting this one aside. So now I have to admit that I am proud of myself. Here it is, just three days after Christmas and I finished it! I put the last border on, made the backing piece and quilted it on Thursday. I finished binding it yesterday afternoon, so really I finished it in two days but I didn't photograph it until today.

Oh crap! It doesn't have a label yet so I guess I am not quite finished after all. Gotta keep that momentum going.

Tuesday

Ceramic Santas

Ceramics ClassBack in the early 90s I went to ceramics class with a co-worker and her mother and sister.  Over a course of a few years we had a great time making lots of adorable things. Of course over the years as tastes and styles change, many of those things we made are long gone.  The one thing that I did make that had stood the test of time is these pencil Santas, as they were called.  I flipped them over to see that I carved the year, 1992 into the bottom of them.

To reflect the current times, last year I made a garland out of felt balls. This year I thought I would string them up again but I found that they were all tangled up and I didn't have the patience to untangle them. So here they are, surrounding the pencil Santas. Let's just call that an upgrade into the new millenium! I still love to put them out every Christmas season.

Monday

Christmas Tree Skirt

I purchased a 10-degree ruler earlier this year for some fun projects.  I thought I would try it out by making a Christmas tree skirt for my skinny tree.  It didn't need to be very large, just large enough to cover the base of the artificial tree.  The ruler can cut pieces up to 25 1/2 inches long.  I used up my scraps leftover from last year and the trick was getting directional pieces cut so that they were not upside-down.  That meant there would be some waste...or so I thought.

10 degree ruler
I didn't use any instructions, I just decided to start at the top of the ruler and make the strips 20 inches long. They were going to be skinny strips, perfect for the skinny tree.  I didn't do any math, I just decided to start cutting. So I cut 4 pieces of 6 different fabric then commenced to sewing them together using the same order with each set of 6 strips. Once the 4 sections were completed I realized I needed quite a few more strips; 12 to be exact. I started cutting more and that's when I ran into a little trouble. Either I would have to cut some directional strips upside down, or use different fabric altogether.  I chose to do both. I think that made it a little more scrappy looking in the end. 

After I sewed them together I got out some strips of batting left over from bigger projects.  This is one instance where I don't mind sewing two strips of batting together to make a large enough piece.  Unlike a quilt, there won't be much snuggling with a tree skirt, so I don't see the necessity of using a single piece of batting. No one will ever notice.  

Using a square piece of red Kona for the backing, I pinned the top, batting and backing together.  I do not cut the tree skirt shape out when I get to adding on the backing, I just leave it whole and quilt it.  After the quilting is completed, I then cut away the backing.  I used a striped fabric for the binding and added some large red and green buttons.  The trick is using small rubber bands to hook the buttons together once it is place around the tree. I also added 3 yards of large red rick-rack around the bottom for added decoration. 

Now it's under the tree just in time for Christmas.

10 degree ruler
Tree Skirt in the Snow

Thursday

Wednesday

Teacher Gift Bags


Sweetwater Birthday Bag
I used Sweetwater's Birthday Bag pattern to make a Christmas version of their bag. The Sweetwater pattern came with some premade labels so I stole that idea and printed up some of my own that said Merry Christmas. The Christmas prints are so bright and cheery and once the bags were completed, they seemed like a perfect fit for my granddaughter, Chloe's teachers.  She has two teachers who attend to her class and two teachers' aides as well. So of course, I had to make four bags. I bought the most adorable coffee mugs and filled them with cappuccino mix and some Godiva chocolates which fit perfectly in the quilted bags. Then I attached a tag I printed off the internet and hand-wrote Chloe's name on each tag. I sure hope they like them, they are all so wonderful.

Saturday

Veterans and Quilts

My church group, the Sweet Sundays Quilters made some lap quilts for wheelchair patients over the last few months. And it just so happens that every December my American Legion Riders motorcycle group takes a trip to the VA Hospital in Milwaukee to specifically visit the Spinal Cord Injury unit of the hospital.  We take with us handmade Christmas cards that were given to us by local elementary school children. The cards are adorable, most say "Thank you for your Service" and "Merry Christmas" in the most eloquently misspelled ways that define cuteness. You can feel the love in those cards.  And what a perfect place for me to take the church group's handiwork.
Quilts and Candy
I have made it a tradition to purchase Hershey's Hugs and Kisses and make little sacks wrapped in red and green tulle and tied with a ribbon. There's nothing like chocolate to make someone's day. Our group spent Wednesday evening visiting with these wonderful people and giving out our goodies in a gesture of good cheer. I took a few photos of those who would allow it. They were thrilled to get the quilts and we were so happy to spend some time with folks who had so many amazing stories to tell about their vast experiences travelling the world while in the military.

A Veteran from Michigan gets a Quilt
A Veteran from Wisconsin gets a Quilt

Tuesday

Quilts for Kids - Packer Quilt

Rail Fence Quilt for Kids

Bailee was excited to join me at a Quilts for Kids meeting a few months back and she grabbed a quilt kit and started working on it.  She completed the entire quilt top using the rail fence pattern and got the binding done in two meetings.  After that, she struggled to find time to finish it. Luckily, I have lots of decent sized pieces of batting so I told her I would put the layers together and quilt it for her.  I was on a roll, I pinned the layers together and completed the quilting in one evening. Since I got it done so fast, I also attached the binding she made.  Quilts for Kids requires machine sewn binding and even though I usually hand-sew the binding on, I am getting used to how quickly I can finish a quilt by machine sewing it on. So it's done and we have another one to take to the next meeting - YAY!

Friday

Quilts for Kids - Precious Moments Quilt

Quilts for Kids

I took a Precious Moments fabric panel from the donated fabrics at one of our Quilts for Kids meetings. Since it is so pretty "as is" I thought I would do something a little more interesting on the back.  I grabbed some fabrics that would match and some pink Kona from my stash and made some 9-patch blocks. I then cut them into quarters to make disappearing 9-patch blocks.  I got 12 blocks out of the fabrics.  I added a few strips of the leftovers from the 9-patches to fill in between the rows.  It's straight-line quilted to accent the pretty alphabet blocks. I have so much fun making these for Quilts for Kids.

Thursday

Bill's T-Shirt Quilt Completed

I finally completed this t-shirt quilt. I had the most difficult time working on this project because it's for someone else.  The whole responsibility of cutting up someone else's shirts was a little intimidating.  I had such a fear of making a mistake that it took me a lot of planning to even get started.

When I did start, I cut all the shirt logos out with the maximum fabric allowed to be sure to have plenty to work with. Then I backed all the pieces with Pellon 911F, a heavy duty iron-on stabilizer.  After that I was stuck on where to begin to start placement.  So I grouped the shirts by subjects. That didn't quite work.  Then I spread them out to try to vary the colors to get variety. That didn't work very well either.

Unfortunately, some of these shirts were pretty worn. Working around that was a little challenging. I stacked, sorted, restacked and laid out these "block" over and over without getting anywhere.  For inspiration I googled the subject and searched for photos of completed t-shirt quilts.  Some were framed in fabric, which I did not want to do because I had so many shirts. That idea would only work if I had maybe 12 shirts but I had a lot more than that (30 to be exact).  So I knew I wanted to stitch the shirts together somehow. I started looking at tutorials and finally found the right one. The tutorial I used was more about making calculations than anything else so I followed the directions to a tee (no pun intended).

As is turns out, the secret was making columns of blocks and I was trying to make rows. All I had to do was measure the width of each logo, then sort the blocks by that width. Obviously since I cut them a lot larger, maximizing the amount of fabric available around each logo, that gave me lots of wiggle room.  I ended up with 4 piles, one with 16-inch widths, one with 14-inch widths, one with 10 to 12-inch widths and one that had 8-inch widths. Then from each pile I determined with block had the least amount of width of fabric around it, squared it up, then cut all the rest the same width, leaving lots of length to work around after the columns are sewn together.

After I went through that process with all the piles, I had 4 very neat columns of quilt blocks. Now for the fun part, I laid them out in 4 rows.  Amazingly, some of the subject matter fell in groups - I had an entire column of UW-Madison blocks! In retrospect, that makes sense since the words, University of Wisconsin Badgers or University of Wisconsin Madison, had lots of letters in them. I rearranged each column into categories/colors to compliment the neighboring columns.  It was going together like a jigsaw puzzle, each piece seem to fit naturally.  That is until I got to the smallest column.  I bent the rules here. I turned some of the squares sideways to make them fit nicely and I actually pieced a block with sections from the same shirt, cutting away the worn parts and then putting the rest back together. I thought that was  important because the graphic on this shirt contained the owner's name. I really wanted that incorporated in the quilt no matter how many holes I had to work around!

Once laid out, it was easy to adjust the lengths of the blocks by cutting off some of the extra fabric I left in each block. So away I went, stitching the columns together.  Unfortunately I ran into another snag.  My machine broke down.  Here I was ready with my new ball-point needle designed for jersey knit fabrics and I couldn't sew.  I took machine in for repair. I was so excited that I was finally going to get this thing together and I lost a week to the repair shop.  Once back, I started stitching.  Then the bobbin winder on my machine broke.  I felt defeated and started to wonder. Should I be looking at a new machine? After all, mine is over 20 years old and this will be the third time the machine is in the shop over the course of this summer and fall.

I started looking and picked out a new one that I liked. As I got ready to put a deal together I got a case of buyer's remorse.  I love when that happens BEFORE spending $4K instead of after. So I got my old girl fixed again and as it turns out it was very minor so she should be humming along for a very long time now.

Once the top was finally done, I had to choose the backing fabric.  I knew I wanted it to be gray but I didn't realize how hard it would be to find that color. Most fabric stores were out of gray and the ones who did have it didn't have the necessary 3 and a half yards that I needed. After a few weeks of searching/waiting for sales I picked up the backing. This darn quilt is taking forever. I feel terrible.

I finally layered the quilt, batting and backing together and did some straight line quilting on it.  I made the stitching in rows 2 inches apart.  I originally wanted to put them closer together but the stretchiness of the t-shirt knit made it impossible without a lot of stretchy puckers.  After a few rows of quilting, I decided it looked OK with the 2 inch gaps.  Another problem occurred. Some of this fabric was worn pretty thin, a sign of a very loved shirt. I thought by backing it all with the heavy duty 911F I would be saving the fabric from more wear.  However, from stretching it to pin the layers together, some of the fabric split into a tiny little hole right in the center of the quilt. Taking this thing apart to fix it would have been an enormous job. After consulting with quilty friends, we decided to mend the hole later.

Once the quilt was done and the mending was finished, I picked out some awesome fabric for the bias binding and quickly attached it and completed the finish work. I added a label with a rustic look, to match the worn shirts.

I popped the quilt in the wash machine and my machine had a little trouble with the weight of all those heavy quilt blocks from all those t-shirts. It's like the spin cycle could not wring out all the water so I wrung it out by hand before putting it in the dryer. And now after a 5-month journey of worry, stress, and 3 trips to the shop for machine repairs, it's finally done. And even after all that, I've waited a few days to get ready to deliver it because today is the first day the sun is shining for a photo opportunity - insert heavy sigh here.

This project gave me more confidence (block assembly calculations) and  a new skill (working with jersey knits in the quilting process) and I really did have fun learning and completing the project.  I sure hope Bill thinks it was worth the wait.
Sunday

Quilts for Kids - Kitties Quilt


Quilts for Kids
This quilt was so fun to make because I did not use a pattern. I love when that works in my favor.

I fussy cut the kitty squares then just framed them with strips of gold fabric. I then put them on the design wall and decided to make 4 rows of three blocks framed in blue fabric strips with a border of the same fabric. And viola! Very simple.Very quick. Love the color combinations because it was constructed entirely out of donated fabrics. Sometimes that can be a challenge since usually fabrics can be coordinated easily but not always is there enough yardage so it is a bonus when it all works out.

I decided to use variegated blue thread to machine quilt this giving it a picture window effect.  Normally dark thread would be a bad idea on light fabric but I thought it gave the whole quilt an interesting look. I hope whoever receives it likes it too.

Thursday

The Hope Doll

I made these squishy little pillow/dolls with a breast cancer survivor theme.  Appropriately, I named them Hope. If anybody needs one, just message me and I will get you one.

Friday

Quilts for Kids - Princess Quilt

Quilts for Kids
I completed this square in a square quilt for Quilts for Kids last week.  I got the fabrics from the clearance bin and I can't believe how adorable they are.  This one went together quickly; I added a small inner border and the larger outer border, used pink flannel for the backing and did some straight-line quilting on the back.  I hope whoever gets it loves it. I know I do!

Sunday

Tell Me a Story Quilt

Comma Fabric
I picked up a kit from the Country Threads booth at the International Quilt Show this summer.  It was cool because it used a traditional country pattern swapped out with modern fabrics. The pattern comes from their book called Hibernation and the quilt is called Tell Me a Story. The results using the modern fabrics sure are different than the red/grey flannel version shown in the pattern book.  I completed the top a few months ago and recently had it professionally quilted. Last Thursday I sewed the binding on.  I couldn't wait to photograph the finished quilt however it's been raining for the last few days.  Today's storm is especially brutal, we have tornado warnings and lots of rain.  But between the bouts of rain, the sun will shine in brief intervals. And the temperature is nearly 60 which is so unusual for Wisconsin in November. So here is my finished quilt...
Tell Me a Story from the book Hibernation
Tell Me A Story Quilt

Friday

Friendship Bags

My Little Pony Miniatures
My granddaughter has a thing for miniature My Little Pony figures. They come in little packets for cheap and when you buy them you don't know which one you're getting. Which makes them addictive at a buck ninety nine each. I think the marketing term is blind box sales.  Anyway, here is what some of them look like.

In our hunt to collect them all, of course we have some doubles.  That doesn't matter, Chloe loves them all anyway. And she knows how many she has so she knows when one is missing.  They are a pain to cart around so I thought I would whip up this little bag for her to tote them around. And her sister got one too!
Princess mini totes
Friendship Bag

Tuesday

Recycled Denim Stuffed with Scrap Quilt Batting

After all the time spent sewing, planning, pricing, packing up and advertising for my church's craft fair, one would think I would take photos of my booth all set up.  But no, I did not. Even with my brand new craft racks ready for the show, I still didn't take the time to snap a single photo.  My excuse is that I was busy chatting with potential customers and making sales all day long.  Not a bad problem to have, but now it's over, and I can get back to normal or my version of normal until the next show.  Whew, I'm exhausted.

With that said, I've been a little burnt out so I took a week off of sewing.  Yes, a whole week. I don't think I ever did that before. I love my sewing room and my fabrics and making stuff.  I will admit that things were in quite a disarray during that last week building up to the craft fair. While trying to do some last minute crafts to sell, I just piled up the scrap fabrics and kept going. So much so that I didn't even post photos of those newer items. Instead I just kept cranking out more. Maybe I will post them sometime but for now, I'm thinking about organizing my fabrics and putting the ones I pulled out away.  There's something about order that makes me want to start again. We shall see if it works!
For now I do have this photo of an over-sized pillow I made out of denim scraps. I love recycled denim. I also discovered that I have a use for those scrap strips of batting that I cut off of finished quilts.  Yes, I have been saving them. I find it difficult to throw away perfectly soft, long strips of scraps even though they are so narrow that I cannot even use them in a potholder. So I cut those long strips into smaller pieces and stuff them into the denim pillows, stitch up the opening and pop them into the wash machine.  After one washing, the batting scraps seem to fluff and fill in the pillow nicely. Even though it is made of denim, it is amazingly soft and cushy. I just love how they feel.
Pepurposed Jeans
Recycled Denim Floor Pillow
I also made sure the back pocket from a pair of those recycled jeans were placed in just the right spot - I think we can store the remote for the tv in there!

Monday

Veterans' Day Tribute Table Topper

Veterans' Day
Heading to the Veterans' Day Parade
My husband is a proud Vietnam Era US Navy veteran.  As such, he is a member of the local Legion Post and a member of the Legion Riders, a motorcycle group of veterans. Both groups work to support veterans that need help. Through his involvement, I am a member of the American Legion Auxiliary and the Legion Riders as well. So together, we work at volunteer events like visiting and handing out little gifts at the VA Hospital (Zablocki Medical Center) and working to raise money for the construction of a Fisher House here in Milwaukee.  He loves everything we do when it comes to veterans' events.

One of his favorite things is riding his motorcycle in parades.  As a member of the Legion Riders, they get many requests to participate in parades throughout the year.  Meeting all the people who come out and hanging with other veterans is a lot of fun. This veterans' day we went out for lunch at the local Applebee's where veterans eat for free. The free food didn't matter, but hanging with other veterans did. He had such a great time.  So for my little part in his day, I made this cute little table topper for our coffee table.  It has Snoopy in uniform representing all the branches of the military.  I whipped it up just in time to celebrate the day.
Military Table Topper
Veterans' Day Tribute

Thursday

Quilts for Kids - Whale Quilt

Quilts for Kids
I finished the whale quilt for Quilts for Kids recently. In fact it's just in time for this Saturday's meeting! I just cut some fabric squares from the whale print and framed the squares out with complimentary colors and sewed them together in rows with a border of those same whales.  I bought some red polka dot fabric for the back but I didn't measure correctly so I didn't get enough.  Instead of buying more or piecing something together, I remembered the 80 yards of flannel I purchased on Black Friday a few years back.  There are still some sizable chunks of it left and I used the red flannel for the back.  It's really nice having that stash as it is perfect for these quilts when I remember that it is there! Finishing these quilts sure feels good.

Friday

The Aerika Purse

The featured Aerika Purse was originally made from fabric selvages and it is adorable.  Even though I have enough selvage fabric to make one like the original, I chose to whip some up using some whimsical fabrics. The designer's pattern was easy to follow with nicely written step-by-step instructions. You can get the pattern download here.

Here are my versions of this lovely pattern:
Tweener Tote Bags
Aerika Purse

Thursday

Recycled Denim Sack

Denim Bag
I was inspired by the lunch sacks made over at the inner child fun blog.  That version was made out of recycled jean pants legs and had an apple stamp on the added pocket. My version uses the recycled jean pants legs for the bag too but I used the little pockets tucked inside the larger front pockets of the jeans and sewed them on the front of the bags instead. They are pretty small but oh so adorable. The tutorial for the original bag can be found here.

Wednesday

New Craft Fair Display Rack

Wooden Fold Up DisplayOver the past few weeks we have been very busy with church, a rummage sale, my sister's surgical procedure and putting summer things away before winter comes.  It's incredible how quickly the days go by. Unfortunately, it's not a good time for me to be away from sewing since the craft fair season is quickly approaching. With that in mind, I recently got my husband to make me a new display rack.  The one I had was tall and heavy. It was pretty cumbersome for hauling and it barely fit into my SUV since it was so tall. Jeff made it from wood he had leftover in his wood shop.  It was economical and very useful. Unfortunately it was so heavy I struggled getting it in and out of the truck. So I designed a new one.  This one is shorter and made from a lighter wood.  Instead of cutting 2x4s in half, this one used 1x2s that were made of clear aspen, a very pretty wood.  So now it fits nicely in the SUV and I can lift it all with one hand. And it is very pretty. It folds up nicely and still has lots of display space. He is so good at making this stuff, and I am so lucky to have his help. Time to get back to sewing!

Wooden Fold Up Display

Monday

Baby Burp Cloths

I washed some flannels and ultra cuddle fabrics and whipped up these baby burp cloths.  I wasn't really sure what a nice size would be for these things so I used the measurements from Made by Rae's tutorial.  The link to that tutorial is here.

Made by Rae Burp Cloth Tutorial
Baby Burp Cloths

Friday

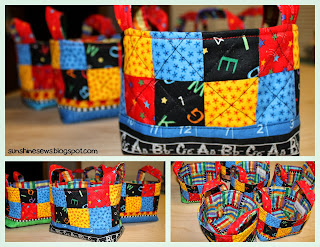
Quilted Teacher Gift Baskets

Teacher gifts
Quilted Teacher Baskets
I made a bunch of these cute quilted baskets as teacher gifts for my granddaughter, Chloe.  She has four teachers, but I made 6 baskets. I just never know if there will be that special someone who should get one of these so I figured a few extra wouldn't hurt.

I made these using a tutorial over at Pink Penguin's blog.  You can find the instructions here. It's easy to make and actually easier than what I did. I added the machine quilting over the blocks and the tutorial did not include that.  I also fussy cut the fabric that makes the bottoms, so I had to make the bottom piece a little bigger so I could cut it in half then put it back together so that the directional fabric was facing up on both sides.

I am not sure how we will fill them, but at least it's a start on the Christmas items for this year.

Tuesday

Recycled Denim Fabric Baskets

Recycled Denim
Now that October is here, besides fall, pumpkins, colorful leaves and cool weather, it's time to think craft fairs. Pretty soon it will be time to sell some crafts so I think I need to start concentrating on making more. It's been in the back of my mind, but now it's time to get moving.

I've had a stack of old blue jeans just waiting for something like this.  I used a tutorial I found on threading my way's blog to complete these. The link for the tutorial can be found here. These baskets went together quickly and easily so I will be making more later this month. It was fun to pick out the lining fabric and I think I can come up with many more ideas for the insides of these.

I hope I don't run out of old jeans.

Sunday

Sweet Retreat's Little Sister Tote

I picked up this tote bag kit from the Wisconsin Shop Hop this summer.  I love words and letters on fabrics and this fabric is very special since the words are all cities and towns in Wisconsin. Not to mention that it's in my favorite color combination, black and white. I just had to have it.

Since summer is officially over, it's time to stop staring at this kit like I have all summer long and actually make this tote! The pattern is from Whistleped Creek and it is called Sweet Retreat's Little Sister Tote.

It has very sturdy panels because of the fleece iron-on interfacing it contains. I love the clever way the multiple pockets are made and I learned a lot about careful pocket planning both inside and outside the bag. I will definitely use these techniques again.

Tuesday

Custom Fence Panel

I've been following Pinterest for quite a while and I seem to constantly return to the same photo.  It is a picture of a pergola and a privacy wall covering a nice patio.  That privacy wall is built out of two-by-fours forming a grid and there are random glass blocks in some of the grid openings.  I wanted very badly to use that idea.

We recently installed some fence panels on our lot line to give us some privacy.  In the process of doing that project, we had our fence post hole guy dig two extra holes next to our hot tub.  So here was my chance to use that Pinterest inspired idea.

My husband and I installed the 4x4x10-feet long posts into the ground next to the tub. After a few days to ensure the cement footings were firm, we filled the dirt back in and cleaned up the rest of the piles of dirt left over from the dig.  From there I got out my graph paper and measured and re-measured the opening.  I drew out the plan down to every little detail. On Friday morning I went shopping for glass block.  

On Saturday morning, he went shopping for the lumber and we started to build the grid that would hold the glass block.  Between the shopping and laying out the grid and the frame, we used up most of the day. On Sunday morning, we installed the grid-frame structure to the fence posts.  It went up quickly and easily, thank goodness. Then we spent the day cutting the boards to fill in the bottom half of the fence.  On Monday I installed the glass block permanently by using silicone caulk to hold them in place.
Custom Privacy FenceI am so excited to see this project completed. We discovered together that we can do our own thing without worrying too much about having an expert draw up a plan - we can do it all ourselves! This was one of the most rewarding non-sewing projects I have ever completed!

Thank you, Jeff for your fantastic woodworking skills, we make a great team.

Thursday

Inspired by the Harley-Davidson 110th Anniversary

Today's sewing project is a little different than my usual quilty or crafty things that I love so much.  I do this project because I love the person who wears these so much.  I am very proud of my Harley riding, Navy veteran husband. Over the years we've been on many motorcycle rides. We both enjoy the thrill of the open roads. In fact when he want to take a long ride, and doesn't have any plans to head to a specific place, I can get him to take me to far-away quilt shops. For him, any excuse will do to take a ride. I joke about how a prerequisite of living in the Milwaukee area is that you must own a Harley motorcycle. And we do.  As an added benefit, our daughter, Jennifer works in clothing design at Harley which gives us the opportunity to meet many wonderful people from the company including her boss, Karen Davidson. One of our most memorable trips was to Sturgis where we actually rode along with Willie G and Karen and their entourage. Plus we get some of the samples to try out before they hit the market, how cool is that?! But I digress. This is about the patches.

We collect patches from Harley dealers and events on our travels. They make great souvenirs that are easy to carry in our limited luggage space when we are traveling on the bike. My to-do list includes sewing them onto my husband's vests. I am very delinquent in that task.  But in the last few days all I can hear out of my sewing room window is that low hum of the Harleys (some people say it sounds like 'potato-potato-potato...') coming in to town. With the 110th Harley-Davidson Anniversary Celebration starting today, the sound is constant which I find a little exciting.  I imagine the places where they are coming from and I wonder how their journey was to get here. There I go, daydreaming again instead of getting to the patches.  So I am inspired to get those patches sewed on so that Jeff can wear any of them as we go out to enjoy the events around town.

He has a leather vest dedicated to the American Legion Riders, a group of veteran motorcycle enthusiasts that work towards raising money for the Legacy Fund and the Fisher House, two important causes that support veterans and their families. He also has a leather vest from our local HOG (Harley Owners Group) chapter.  He wears the Legion Riders vest, of course, at all the ALR fundraisers and when the group is riding in parades. He wears the HOG vest when we are out going out of town. With the large Milwaukee Chapter patch on the back it's a way for people to see where we're from at a glance.

110th Anniversary
Jeff's Vests
The third one is a jean vest that is much nicer to wear because it is so much cooler in the summer than the hot, sweaty leather ones. But The leather ones have been around for years and have had patches on them as well as signatures from the Davidson family. It's a sort of status symbol if you have their autographs on your vest. They needed some new patches added so I got out my leather needle and got them all sewed on.  The jean vest was a blank canvas, no patches, nothing on it. I thought that would be a good place to put all the patches that represented places we've been. But after getting them all on, I still had a large blank space. That's because I have patches from other cities however, I can't remember where I put them.  I'm sure they are in one of those 'safe places' that seemed logical at the time, although I have no idea where exactly that would be. But they will turn up when I least expect it (hopefully soon).

Vegetable Spring Rolls

Spring Rolls
I love spring rolls. Especially ones I make from scratch. It allows me to put in more of the ingredients I like and take out stuff I don't like.

The tough thing about these is that it is a little time-consuming. There's making the filling, then letting it cool. Then rolling up the filling in the spring roll wrappers. Then there's the cooking part. I deep fry these on my stove which can be a little messy but oh so worth it. They are that good.


VEGETABLE SPRING ROLLS

  • 1 - 2 tablespoons peanut oil
  • 2 cloves garlic
  • 5 - 6 green onions, chopped
  • 2 cups carrots, grated
  • 2 cups cabbage, shredded
  • 1 cup pea pods, thinly sliced
  • 2 cups bean sprouts, chopped
  • 1 tablespoon cornstarch
  • 1 tablespoon water
  • 2 - 3 teaspoons sesame seed oil
  • 2 teaspoons soy sauce
  • 12 spring roll wrappers
  • 2 teaspoons cornstarch
  • 2 tablespoons water
  • 4 cups corn oil for frying

Heat wok over medium heat, adding one tablespoon of oil. Sauté garlic about 1 minute, add green onions, carrots, and cabbage and stir fry for 3 minutes. Add pea pods and bean sprouts, cover and cook about 2 minutes. Combine 1 tablespoon of cornstarch with 1 tablespoon of water and add to pan along with the sesame seed oil and soy sauce. Cook and stir until mixture thickens. Remove from heat and allow to cool completely.

Separate spring roll wrappers and cover with a damp towel to keep moist. Combine 2 teaspoons of cornstarch with 2 tablespoons of water. Working with one wrapper at a time, wet the edges with the cornstarch mixture. Place 3 tablespoons of the vegetable mixture in the center of the spring roll wrapper and roll up diagonally, tucking in the edges.

Heat the corn oil in a wok to 375° Working in batches, add spring rolls and fry until golden for 1 minute. Remove from oil and serve hot with plum sauce or a mixture of rice wine vinegar and soy sauce for dipping. 

Tuesday

A Tumbler Quilt

Thimble Ruler
Tumbler Quilt
I ordered the Thimble Ruler set a few weeks back in order to make this quilt.  I just love the Noteworthy collection from Sweetwater. So much so that I had enough fabric to make two quilts. Anyway, the size of the ruler allowed for pretty large pieces that would make each piece a focus piece. I followed the tutorial on the Riley Blake design blog and you can find the link for it here.

My new friend from Quilts for Kids, Renee let me use her AccuQuilt and the dies in order to cut the flowers for this quilt.  I also used some on the back.

I took some of the leftover fabric to make the panel on the back.  That happened by accident.  The truth is I cut the ecru fabric wrong.  It was supposed to be wide enough to go across the entire quilt and for some reason, I cut it way way to narrow. Therefore, I had to add some fabric to it and since I had to, I needed to make it look like I did it on purpose. So I cut the ecru fabric off center and spliced in the leftover Noteworthy. 

Just when I thought I was ready to put the layers together, I noticed the leftover flowers I had cut and it hit me at that moment that I should add them to the back for some consistency and continuity. I quilted along the edges of the tumbler blocks to add depth to each piece.

Monday

Noodle in a Haystack Quilt

Sweetwater Noteworthy
Noodle in a Haystack
Using the Noodle in a Haystack quilt pattern from Rodney Gile, I made this quilt.  I finally broke open my fat quarter stack of Noteworthy by Sweetwater for this.  It seemed like a great way to use the 30-plus fabrics in the collection.  And I did use them all!

I also had some extra yardage of the Noteworthy collection and used the fabric, Plant a Garden in the color, Cloudy for the back.  I quilted it with random stitch lines to complement the randomness of the 'noodles'.

Wednesday

A Birdie's View Baby Quilt

I've always liked these collections of quilting fabrics from Heidi Grace. They're all in pretty pinks, purples and aquas with the most adorable little houses, birds, windows, and other simple and pretty patterns. I've had this fabric sitting around for a very long time (years) when I came across a quilt called 'cub crawl baby quilt' by John Q Adams. It's in a book by Fat Quarterly called Shape Workshop for Quilters. As he hints by the title of the quilt, the one Mr. Adams made has bears and other cute wildlife prints. So I think for my purposes, I should change the name of the quilt pattern to 'a birdie's view'.

I thought this pattern would go well with the fabric because the blocks are quite large so that all the fabric can be showcased within the quilt.  And I love how quick and easy it was to piece.  I machine quilted it with wavy lines to soften the look of the large blocks which also created a nice contrast.

Saturday

Garden Cabbage and Vegetable Beef Soup


Garden Cabbage
I love gardening just about as much as I love sewing.  Both produce such rewarding results. Every year I try to plant something new and different in my garden.  This year the new includes cabbage and the different includes tomatillos. It hasn't been a very warm summer so I'm not sure when I will see tomatillos, however the cabbage is doing great.  As you can see from the photos, my first head harvested is a very nice size. 
So it's time to make some soup. Between my garden and the farmers' markets, I have some beautiful produce and there's nothing like a nice vegetable beef soup for a light supper. This is an easy recipe and since the soup doesn't take much more than an hour to make, the vegetables are still firm, preserving their fresh taste. I serve it with some nice artisan bread.

Vegetable Beef Soup
  • 2 tablespoons olive oil
  • 1 pound beef stew meat, cut into small cubes
  • 3 large carrots, peeled and chunked
  • 1/2 large onion, diced
  • 4 garlic cloves, diced
  • 2 small bay leaves
  • 4 cups beef broth
  • 1 14-ounce can diced tomatoes in juice
  • 3 cups coarsely chopped cabbage
  • 2 small Yukon Gold potatoes, peeled and diced
  • 1 cup frozen corn kernels
  • 1 cup frozen peas
Heat 2 tablespoons oil in a large pot over medium-high heat.
Sprinkle beef with salt and pepper. Add beef to pot; sauté until outside is no longer pink, about 4 minutes.  
Add carrots, chopped onion, chopped garlic, and bay leaves. Sauté 5 minutes.
Add the beef broth, tomatoes with juice, cabbage and potatoes. Bring to a simmer.

Partially cover the pot and simmer until beef and vegetables are tender, about 50 minutes.
Stir in corn and peas; simmer until tender, about 5 minutes.
Season to taste with salt and pepper.

Vegetable Beef Soup

Tuesday

The Cinch Bag

The Cinch Bag
I've had this adorable fabric since last summer. It's called Unforgettable for Quilting Treasures and is licensed by Desilu, LLC for I Love Lucy & CBS.  The thing about that is I don't understand the connection. The I Love Lucy Show was about the antics of a housewife married to a Cuban bandleader.  The fabric itself reminds me more of something from a television show of the same era called 77 Sunset Strip. 

The colors are beautiful and the fun map and road sign fabrics are so very cute that it seemed like a no-brainer to make it into a bag.  And I've been wanting to make 'The Cinch Bag' ever since I saw it on the Sew Can She blog.

The problem is that I didn't know what I wanted to do with the fabric when I got it on sale and I really love the teal stuff more than the road sign print so I only bought 1 yard of the teal and a half-yard of the coral print. The Cinch Bag needs 2/3 yard of fabric for the bag and 1 2/3 yards of fabric for contrast.  The tutorial for the bag had all the parts out of contrast except for the main bag.  So how was I ever going to make this work?

Since I liked the teal best, I cut the main bag out of that first. Then I knew the casing should be the highest contrast so I cut that out of the coral print.  With not much coral print left, I cut the handles out of it.  There were supposed to be 4 pieces cut of the same fabric (inside handle, outside handle times two) but I did not have enough coral so I cut the 2 outside handles from the coral and the inside of the handles from the teal.  The ties were cut from teal since that was all I had left.  So now I am down to a 7-inch strip of coral print.  I decided that it could line the inside - all I had to do was add some other fabric for the rest of the lining since it wouldn't be seen (except by me) anyway.  So I grabbed a chunk of Kona white for the bottom of the lining.


Again, since it would only be seen by me, I did not change the thread color when I put the inside zipper pocket in.  So the blue thread really shows against the white. The tutorial for this is from Sweet Verbena and you can find it on her blog.  Here is the link.

Wednesday

A Mini Quilt in Red, White and Blue

In an effort to use up my old red, white, and blue leftovers I found a tutorial for this cute little table topper.  Here is the link to it.  It was a perfectly sized pattern to use to cover the bistro table on my front porch. All my accents to the house are either wrought iron black or red.  I love how red things look against my blue and white house.  The color just pops.

So I cut the required strips to make the blocks and within 2 hours, I had the whole top done.  I took some of the larger scrap pieces to make the backing and dug up some leftover batting from my stash and by lunchtime, it was quilted.  I did have to use 5 strips of fabric to make the binding, there just wasn't enough long pieces of anything which is good - that means I am finally using it all up.  Yay!  The results look so good on my little table. 
As usual, the tutorial for this can be found on the Sew Can She blog.

Monday

A Quilted Sewing Machine Cover

Quilted Sewing Machine Cover
Yes, I am on a Sew Can She rampage these days. While perusing the Sew Can She blog (again), I came across the most perfect sewing machine cover to make for my machine. And it just so happens I have a fat quarter pack that I purchased at Sewn Studio in Cincinnati on one of our trips to visit my cousin that would work well for this project.

I think collecting fabric as souvenirs is a wonderful thing.  First of all, I get more fabric which is always nice and secondly, I am not wasting my money on meaningless tchotchkes or just plain junk. I will always use the fabric which will invoke memories of the trip I was on when I purchased it.  So my souvenirs, in a way become even more useful. At least that's how I justify it. 

So this fat quarter pack is called sew stitchy by Aneela Hoey and it just seemed so appropriate to make a dust cover for my sewing machine out of it. There is enough left after making the cover to make a scissors pouch to keep in my Tutto case for when I go to quilty group. But I think I will save that project for another day.  The original tutorial can be found here as well as on the Sew Can She blog if you would like to make this same sewing machine cover.

Sunday

A Scrappy Gathered Skirt

I am forever a fan of the sewcanshe site.  It inspires me to make things I wouldn't normally think about making. I came across an adorable little girl's scrappy skirt a week or so ago and I knew I had to make one. 

Recently I bought some fabric-by-the-pound which meant I had lots of scrappy pieces that I purchased on purpose. Especially the fabric with the pink and purple ponies and castles.  It really needed to become something for Chloe and I didn't know what until this skirt popped up on the site.

It was a no-brainer. I got out the castle fabric, a fat quarter that said "thunderous 3" on it in pink, leftover princess fabric from the bag I made for Chloe and a few other pretty scraps I had on hand.  It came together perfectly without a trip to the fabric store. I love when that happens.
When I got to the petticoat underneath the skirt, I was a little worried however, I had made a giant white fabric square to cut a large fabric circle for another project and I still had the edges of that left.  I cut those leftovers into pieces I sewed together to make the white layer. Whoopee! Still no trip to the fabric store.

The tutorial photo for the skirt shows two rows of rick-rack on the edge of the skirt.  I found some white rick-rack in my stash but I didn't like it on the skirt.  So for now, it's done sans rick-rack. Maybe I will get some on my next shopping trip...or maybe not. I still think it looks cute even without the rick-rack.  You can find the tutorial here if you would like to make one.

Saturday

Quilted Stacked Coins Pillow Cover

Quite a few years back I made some patriotic quilts.  They were completed way before blogging and recording quilts digitally.  In total, I made three quilts out of red, white and blue fabrics. I used a postage stamp pattern to quilt them.  I donated two of them to a veteran's organization and kept the third for myself.  I thought it would be nice to take to the fireworks on Independence Day. After a few years, I lost track of that quilt only to discover that my son packed it in his things when he moved to California 5 years ago. 

While cleaning and sorting my fabric stash, I came across an old bin of remnants. In it was the leftover scraps from the red, white and blue quilts. Today, I would consider some of those fabrics outdated and never considering buying them now and others are so adorable I wish I had more.  So I took them all out and sorted through them and found some sewn strips.  So I took them and made them into a stacked coins pillow cover. 

After completing it, I found it a perfect spot on the front porch rocker.  Now that it has a place, I envision making a table cover for the bistro table on the porch as well.