Showing posts with label Modern. Show all posts

Friday

Quilts for Kids and a Wedding Quilt

The morning sky is so pretty. It might be spring now but it is still cold these days. I can't wait until those trees have buds on them. 


I longarmed a client quilt this week. It was a very pretty salmon color. I used a nice large swirly pantograph pattern to complement the blocks.


I finished a few more 3-yard quilts for Quilts for Kids. I love the patterns so much. They are easy to follow and I like the variety of patterns available. The only knock I have is that the patterns have one and a quarter inch binding strips and I would rather do two and a quarter inch binding. So I never follow the binding instructions. 


I squeezed in some quality time with my granddaughter Avery. We went out for pedicures. It was her first time. I think she will want to do it again.


Our friends Linda and Bill got married last fall. They chose to throw a wedding reception in March. We were happy to join in their celebration and I made them a wedding quilt. Linda's favorite color is red so I incorporated the color in as well as a few motorcycle themed pieces of fabric. They belong to the American Legion Riders Motorcycle group and love to raise money for veterans. So this really seemed like an appropriate representation of the things they like.


Saturday

Valentine Hearts Mug Rugs

I purchased a PDF pattern from Etsy for these cute little mug rugs. I couldn't wait to get started on them the moment I printed out the instructions. Pink is one of my favorite colors so I loved playing with the fabrics.

These were so very easy and fun. I didn't do anything fancy to the hearts or letters, they're just raw-edge appliqué.  

Last year I made many table toppers. So many that I got tired of binding them. This is one of three that I had left to bind. It's rewarding to call another unfinished object completed. 


Speaking of UFOs...

Tiny Town Quilt


My tiny town quilt is on the longarm. I can't decide how to quilt it so it might be sitting here for a while.

Sunday

Positive Energy 100 Block QAL

I decided to join a quilt along and I got really excited about it. Then I discovered it happened last year. That explains why the price for the QAL was discounted. Even though it was from a year ago, the files and videos are all still available and the social media posts from the project tell me that many people are still finished their projects. So I'm all in.

After my first week I finished the first 10 blocks. 

And as of today, I finished the second group of 10 blocks. They were pretty easy so far but as I look ahead I see some applique and some bias trimmed blocks to come. I think I will set this project aside for the rest of the weekend and work on something else so I don't burn myself out.


I have a quilt I could longarm now but I'm struggling to pick a quilting design so I think I will let it sit. Instead, I decided to make up this Lori Holt block from her pattern Cut, Press, Sew, Quilt.


This was so quick to put together that I cut out the fabrics to make the Cut and Press blocks. It will be a lot of fun to finish all 4 of the blocks.

Ron's Quilt

This summer I met a man who asked me to make him a quilt. He was pretty vague about what he wanted. He asked for a twin size quilt that he could use to cover himself in his recliner. I asked him what he liked (modern, traditional, colors, prints, etc.). All he said was that he liked blue and green. That's about all I could get out of him. I did tell him I could do it but not until September. 

I sent him a photo of some fabrics I found that I thought would meet his easy requirements. I told him I was a little behind but I had a pattern picked out and these fabrics and he said no hurry. 


I used the Yellow Brick Road pattern to make the quilt top. It's a pretty easy pattern and with this fabric line and a few solids, I think it will be a great quilt. I finished the top in just a few days and decided to quilt it using a pantograph called loophole. The swirls in the pattern were a nice contrast to the geometric prints.


I used green fabric for the backing and binding, the same green that can be found in the blocks. 


Ron will pick up his quilt later this week. I hope he enjoys his homemade quilt.

Monday

Yellow Brick Road Quilt

I fell in love with the fabric line by Dan Dipaolo called Lemonade. I knew I just had to make a quilt. My boss asked me if I would like to make a sample for the shop. She wanted me to use the pattern Yellow Brick Road by Atkinson Designs. 

So I came up with this:

Lemonade by Dan Dipaolo

Lemonade by Dan Dipaolo

Lemonade by Dan Dipaolo

I love it! And here it is hanging in the shop.

Lemonade by Dan Dipaolo

Once the fabric is all gone, it will come down and I will take it home. 

This week I also had the opportunity to help a neighbor. His sister decided to get married with 3 weeks' notice! Everyone in the family was scrambling to find proper attire for such a fine event. Anyway, my neighbor could not find pants in his exact size without ordering them and waiting for them to arrive which would have been too late. So he found a pair that needed to be lengthened. I took the hem down and then I had to get out my instructions for sewing a blind hem. After three tries I think I got it. Ha!


On the home front, my kitty decided to become a mouser. Every couple of days he brings us back a prize to show us what a good hunter he is. Poor little mouse.

Saturday

Dresden Neighborhood Wallhanging


Here is my Dresden Neighborhood wallhanging. The original pattern has the 'neighborhood' in a circle. But if you take some of the dresdens and turn them upside down you get them in a straight line instead of the  circle.

I used Moda Grunge in a blue and green to make the background look like sky on top and grass on the bottom. I also made sure my houses were stitched down in a rainbow effect.

I used many of the stitches on my sewing machine to stitch around the houses and roofs as well as to sew on the windows and doors. It was so much fun.

I can't wait to hang it in my sewing room. I also made sure to put a rod pocket on the back in case I enter it in quilt shows.

What's on the design board?

These days my design board reminds me of my thought process. My brain is jumping from one project to another - I can't seem to concentrate on one thing. From an organization point of view, it's a disaster. From a creative point of view, it's great fun. I can't decide what I want to work on and when I do I can't seem to stick with it for very long.

On the left side of my board I have a project called Flying Leap. It's a very modern quilt pattern with a few circles in it. I haven't worked with many projects with circles so I decided it was time to step out of my comfort zone and try something new. I am loving the colors, they are muted and modern. In fact, I've ordered some modern prints to complete the inside of some of the circle blocks.

On the right side of the board are my economy blocks. I am using some leftover fabrics from another project to make these blocks. They are part of a placemat pattern I found in an old magazine. I don't like how some of the blocks turned out - they are much too busy so I am going to have to incorporate some new fat quarters in with the leftover fabrics in order to make them look decent.

In the center, I've made a bookcase block. I think it turned out a little too busy so I will take it apart and try again. The quilt will be a teacher gift and I have the backing fabric picked out so I'm trying to choose colors for the book blocks to match. I just got started and I have plenty of time to complete it. I won't need it until teacher appreciation week, which is in April.

Tuesday

Aviatrix Medallion Quilt

My husband purchased this fabric bundle for my birthday a few years back. I think it took me this long to make it because I was a afraid of the tiny little diamonds in the center. They were quite the challenge.

I started making the quilt at the beginning of summer. I took my time and completed some smaller projects in-between working on this one. Sadly, when I opened up the bundle there were some fade marks where the fabrics were folded. A definite sign of taking too long to work on this.


Once I completed the quilt top, I set it aside in search of the perfect backing fabric. I found a print I liked but the color selections were many and I just couldn't choose one color. Then I went on a shop hop with a church group not looking to find anything in particular. And lo and behold, there was this nice gray fabric with text printed on it. It was perfect. I bought 5 yards.

I made the backing and loaded it on my longarmer. It's pretty big and it took me 3 days to finish quilting it. I used a variegated thread and a pantograph called Leaf Crown.

Last night I finished sewing the binding on using the same fabric as the backing. I was watching the Green Bay Packers game and happily by the time the Packers won, I had the binding done. Ha!


Monday

Scrappy Granny Squares Quilt

I made a scrappy granny squares quilt using a tutorial from Quilty Love.  It's a great tutorial with straightforward instructions that are easy to follow. The blog post with the instructions can be found here. There's even a PDF to download for easy access.

I used a jelly roll I purchased at Nancy's Notions last fall and some white Kona from my stash. It was easy peasy to put together.

I quilted the quilt using a pantograph called Leaf Crown. It has lots of large pretty swirls to compliment the quilt squares.

The backing and binding is in pretty teal dots that match the fabrics in the jelly roll. I like that the fabric bundle had some navy blues in it. I normally would not choose that color. Fabric bundles help me step out of my comfort zone when it comes to color.

Tuesday

What's on the design board?

I'm working on a quilt called Treasured Friendship. The pattern can be found in the Summer 2018 issue of Quilts & More Magazine.

A fabric panel is used in the quilt with friendship stars. The panel has to be cut into 6 and a half inch squares and placed in the centers of the stars. I purposely chose to wait to cut the panel in pieces because they have to stay in the pattern that they were in before cutting. I figure if I put the entire quilt on the design board before putting the center squares in, I won't mess it up.

This is a very modern quilt top with a very modern panel. I like the color combination because it's not what I usually use. It's nice to get out of my comfort zone now and then. I'm hoping to do more art quilts this winter and this feels like a jump start.

Sunday

Keyhole Quilt

Sweetwater Authentic Fabric
Sweetwater Authentic FabricI made this quilt using a jelly roll and some yardage I purchased last year during Missouri Star Quilt Company's black Friday sale. Coincidentally, I used MSQC's pattern called Keyhole from one of their magazines to make the quilt top.

The pattern requires a jelly roll and a little over 1 yard of fabric for the borders so it sure was a perfect match. The fabric is from Sweetwater's Authentic collection and the modern fabric goes well with the modern pattern.

I quilted this using a pantograph called Bauhaus Baby. It adds another modern element to the quilt. I used a slate gray variegated thread to make the stitches show.

My daughter loves the colors in the quilt. Green is her favorite. I think I will have to wrap this up and make it a Christmas gift for her.

Saturday

What's on the design board?

For a month with a holiday, I am surprised by how much I've accomplished. Last month I cleaned out my sewing room and found some UFOs. I put them all in one place where I can get a handle on them. I've completed a few things but still have some more to do.

The beige plaid patchwork will become a nice quilt for a man that will be donated to the local VA hospital when it's done. I have some nice deer print that will make a great backing for it once the top's done.

The triangle Christmas piece will be a pillow cover (I think). Or maybe a table topper. I just don't know yet. My plan is to experiment with some ruler work on it when I quilt it.

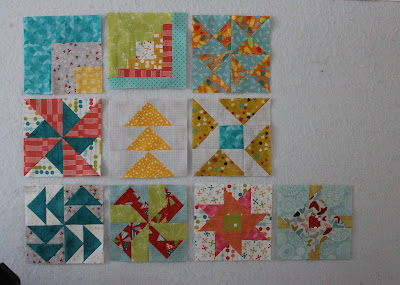
The granny square blocks were made using a tutorial from Quilty Love's blog. The instructions can be found here. I made all 30 blocks and I am in the process of squaring them up. Then I will have to find room on the design wall to get them all in a nice order. I used a jelly roll of the fabric called Sweet Marion by April Rosenthal. I bought the jelly roll at the Madison Quilt show in September from Missouri Star Quilt Company's booth. I can't believe I remembered all that. I think it's a sign that I am getting more organized. Ha!

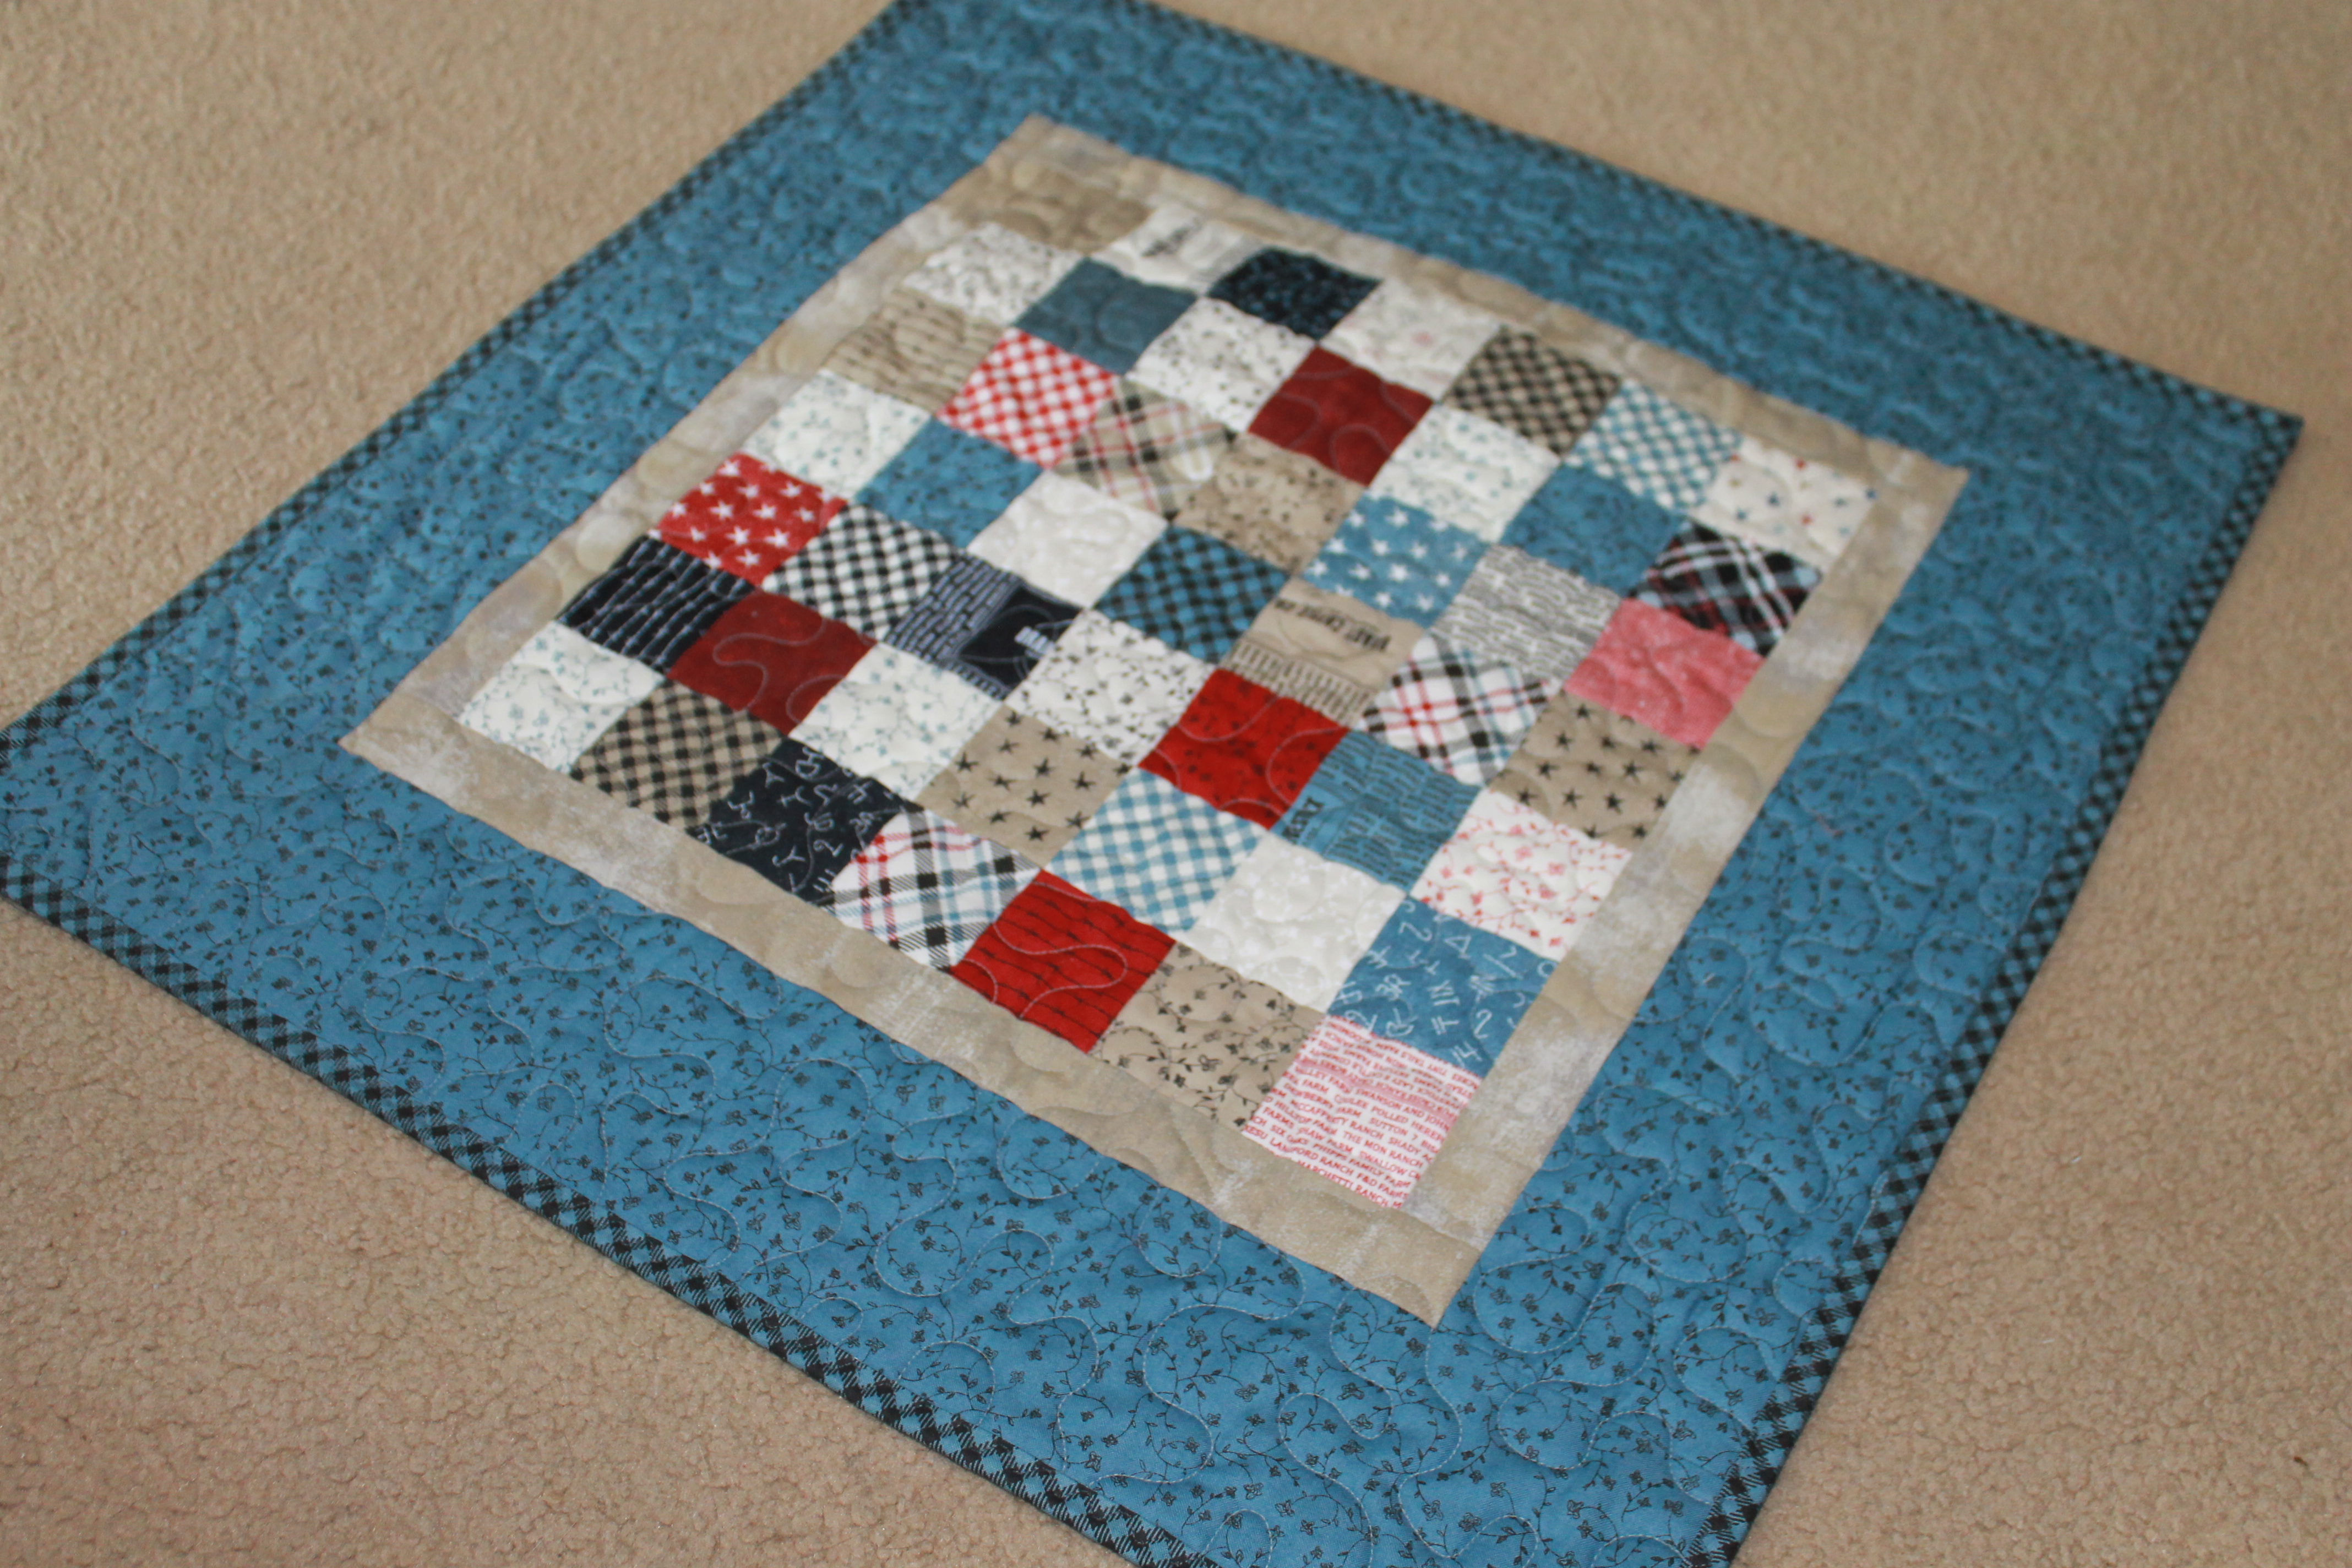
I thought I would throw in what's on my longarmer...this is a quilt that will be a Christmas gift for my daughter. I think I have plenty of time to complete it. However tonight I have a Christmas party to attend and a surprise birthday party. I volunteered to make a dish to serve for both parties so I did the smart thing, I made a quadruple batch of funeral potatoes and separated them into two crock pots. I am ready! If this is a sign of things to come, I might not have much time to quilt this. Ha ha!

Friday

Christmas Holiday Pillow Covers

Christmas Pillow CoverI made a few Christmas holiday-themed pillow covers this week.

For the Christmas tree pillow cover I used a tutorial from A Quilting Life's blog. The link to the tutorial is here. The thing you need to know about the tutorial is that the instructions are incorrect. For the background it says this: Cut (2) rectangles 2 1/2″ x 4 2/4″.
I should have recognized the sign that something was up when it read four and two-fourths. The correct cut is 4 3/4" not 4 2/4". The image she has on her blog is correct but the instructions are where is issue can be found. And of course I cut the wrong size first, luckily I had enough fabric to cut another piece correctly.

I free-motion quilted the pillow tops and used a cute red and white striped fabric for the binding on one and a red print with snowflakes for the other. The backing fabrics are cute Christmas prints from Joanns.

The 4-patch pillow cover was made using charm squares cut into 4 2 and a half-inch squares with 1 and a half-inch strips between the 4-patch blocks. They went together quickly and I like the results.

They sure brighten up my dark brown sofa.