Showing posts with label Bags. Show all posts

Saturday

Bunny Bag & Other Little Things

A while back I made a cute little bunny bag for Easter. It required a hand embroidered nose, mouth and eyes. I did not want to do that. I don't what it is about hand embroidery but it's just not my thing. So I searched the internet for a .jef (machine embroidery) file of a nose, mouth and eyes. Lo and behold, I found the perfect fit. The pattern for the bag was a free pattern that can be found here. I really like how it turned out and I had planned on making more of them but life just got in the way.


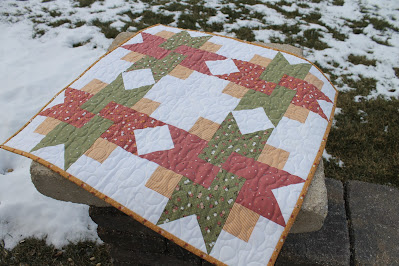
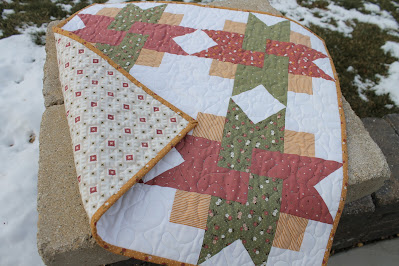
This year I've been trying really hard to say no. But on occasion I will say yes. I quilted this charity quilt for my Sweet Sundays sewing group. It's a pretty big quilt but I got it done in one day. 


I also sewed some patches on my neighbor's kids' taekwondo uniforms. I don't think the word 'uniform' is correct for whatever these outfits are called. I just don't know. Haha!
 

Friday

Winter Quilt Show and Finished Projects

I attended the Winter Quilt Show in West Bend last week and I bought quite a bit of cool stuff. I'm not that fond of wearing t-shirts but I absolutely had to have this one! I picked up some longarm supplies as well. A quilt show is usually the best place to get stuff discounted for my longarm. It's nice to see some of the shows get back to pre-pandemic practices. 


I finished the travel tote bag I started last month. It turned out nice and I like the size of it. Even though I do love the fabrics I chose it doesn't match any of my luggage. So I think it looks funny on top of my teal suitcase. Maybe I will have to make another one to match the luggage or buy new luggage  - haha!

Travel Tote

I also completed the largest of the Lori Holt zipper pouches. The panel came with quite a few of these on it so there's quite a few more to go. I just can't decide how I want to quilt them so I'm not getting as far as I wish when it comes to getting them done. 

Lori Holt Zipper Pouch

Sunday

Table Toppers and Upcoming Projects

When every new year comes around I like to try to complete old projects before starting anything new. So far I finished a large applique quilt and some charity quilts that were started last year. 

Now I have some table toppers on my radar to complete. I made them back in spring and quilted them over the summer. And then they sat.

I dug out the binding fabrics and got them done today. It felt good to get them finished.


I will post them to my Etsy page by the end of the week and get them packed away. There's no better feeling than when an old project gets finished.  With these completed, I broke down and started some new things.

This will be a travel tote bag when it's done:


This is Lori Holt's Zippy Bag panel. I can't wait to make these:


And this is a new quilt project:


I do have a few more old projects to complete yet but I felt like I could reward myself by starting some new ones. Haha!

Friday

Small Projects

I've had this small Chalk Couture project for a few months and I completed it today. My husband made me some shelves for over my coffee station. The shelves are made from wood we had milled from trees on our land up in Marinette County so they are special to us. The shelves are sitting on pipe fixtures, just like some I found on Pinterest. Once he put up the shelves I was excited to make the Chalk Couture project. 

Here's what it looks like on the "coffee wall" shelf. 


I still have some decorating to do to make it look like I want it, so my next step is to get some greenery for color.

Once I finished the chalk project, I dug out some vinyl I've had for a while. I made up this project bag to take to my quilting group. I quilted the back patchwork panel, added a zipper and vinyl window to the front and sewed on binding. It was so quick and easy. I plan on making more in different sizes as teacher gifts for teacher appreciation week which is in April.


Thursday

Football Tote Bags

A little over a week ago I made some Packer totes for a customer. She asked if I could make the same bag from Bears fabric. Since I work at a quilt shop close to the Illinois-Wisconsin border, we carry Bears fabric and Packers fabric. It amazing how many requests we get for Vikings fabric but the answer to that will always be no. So anyways...I could make the Bears tote bags.

I picked up some navy blue canvas strapping for the tote handles and they were completed in a jiffy. 


I will ship them out in the morning so the customer should have them by Saturday. 

Monday

The Office Tote Bag

 I made a few Green Bay Packer totes for a friend to give as gifts. Here they are finished. 

When making the small one, I ran out of webbing for the handles. So I went to the fabric store to pick up more. While I was there I found some crazy fabric. I was heading down the licensed fabric aisle to look at the available NFL fabrics, when I looked to the right. At first glimpse, I thought the fabric I was seeing was Harry Potter fabric. All I saw was a head with glasses. When I took a closer look, it turned out to be fabric from one of my all time favorite television shows - The Office! I was so shocked by what I was seeing that I checked the top of the bolt for the fabric label....and there it was - The Office. 

I had to have it. So once I finished up the Packer totes, I went right into making this tote for myself. 

Sunday

Fall Church Craft Fair - Success!

Yesterday I did a craft fair at my church. The church has held this craft fair for more than 30 years in a row. It is very popular.

In the past, I've had some success at this fair. But I never thought it was that great.  I never took the time to figure out how to do better until after I retired from my full time job.  Now that I have more time to concentrate on my hobbies, I started researching how to do better.

One of the things I noticed in most articles I've read is not to have too many items. People get overwhelmed if there's too much to look at. Keeping it simple seems to be the way to go. I am working toward that goal by limiting my inventory to less things. I also sorted my inventory and display it differently so more like things are together.

I used some bins to display all my baby items. They are all in one place now.  I used my display rack to hold all my bags and pouches. Everything is viewable in one spot.

For a change, I brought along some quilts. I never expect to sell any since the price point is high. It seems most people attending our fair are looking for small, reasonably priced items.

An amazing thing happened this year....I sold more than double than I have ever sold before. My marketing strategy worked. The advice worked. How wonderful!

I also sold a quilt. What a happy unexpected surprise. For the first time in a long time, I am excited to enter the craft fair vending world. I will definitely look for more marketing tips before the next fair.

Some of the items I sold include:
  • Baby Blankets
  • Burp Cloths
  • Boo-Boo Rice Bags
  • Quilted Gift Bags
  • Zipper Pouches
  • Bowl Cozies (sold out)
  • Hot Pads (sold out)
  • Table Runners

The Santa Hustle - Milwaukee

I whipped up this little Christmas-themed zipper pouch yesterday. I needed a place to put my cell phone, car key, and drivers' license. I wanted a pouch to hang around my neck because I participated in the Santa Hustle.

The Santa Hustle is a 5K run along Lake Michigan. It's a fun event where they hand out cookies and candy canes along the route. The issue with the run is that it was supposed to rain all morning then it would turn to snow in the afternoon. Another issue was that since it was on the lake, it was bound to be windier and colder than inland.

And it was cold and overcast. I made the pouch with a waterproof vinyl pocket to keep my cell phone dry. The zipper pocket held my inhaler - something I always need when I run in the cold and my drivers' license. The fob held my car key nicely. I wore the pouch around my neck and tucked it into my sweatshirt for extra security. No one could see how cute it was by I knew - ha!

Here we are before the race. You can see how overcast it was and trust me, it was chilly. I ran the race and I was the second one of my group to cross the finish line. Not bad for being the oldest in the group! After the race we headed to the Harley-Davidson Museum's restaurant, Motor and enjoyed some bloody Marys and a nice lunch. I had a great time.


Tuesday

Posy Pocket Tote - The Holiday Version

When I cleaned out my sewing room I came across a few unfinished projects. This was one of them.

I started this holiday tote last year thinking that once complete I would use it throughout the month of December.

The next thing I knew, it was packed away until I found it while cleaning. I had the outside put together but the inside needed to be completed.

Then I had to make the handles and just put it all together. It didn't take much time once I got going on it.

Now that it's done, I like it so much I want to make another. I love the size, the way it stands up - so sturdy, and the fun zipper pockets. It's going to be perfect for Christmas shopping.


The pattern I used is called the Posy Pocket Tote and the free tutorial can be found here.

Saturday

Selvage Bag WIP

I've been prepping for my trip to Houston and at the last minute I decided to make a bag from selvage fabrics.

So today I started sewing selvages to some muslin to make some selvage panels.

The bag will hold my sewing supplies for the classes I am taking while I'm at the quilt festival. I hope I can finish it before my flight leaves, ha!

Poppy Bag

Tomorrow I am attending a veterans picnic where our American Legion Wisconsin state auxiliary leader will be honored for her successful year of leadership. She just so happens to be a member of our local post and she comments to be regularly about how much she likes my poppy bag. So today I thought I would make her one just like mine.

The funny thing about my bag is that I didn't really use a pattern as much as I just copied some dimensions from another bag. So when I made this one I just got out my bag, measured it and made some improvements based on my bag. The one thing I really wanted to change is that I wished I would have used some heavy-duty interfacing. So I got out my decor-weight iron-in interfacing and ironed it to the inside pieces of the bag.

I put the entire bag together in just one afternoon since I've made so many before this one, it went pretty quickly.

The bag has a nice long shoulder strap and some interior pockets as well as the big outside pocket. the top is zippered shut so nothing can spill out. The interior of the big pocket and the bag lining is made with pretty paisley fabric that matches the outside of this bag. I sure wish I would have taken a photo of the inside of the bag.

I hope the bag is a nice surprise.

Wednesday

Five Nights at Freddie's Travel Bag

After completing a small travel tote for one of my granddaughters, I had to make another for her sister. My oldest granddaughter has much different taste compared to her younger sister. One of her favorite things is the five nights at freddie's characters.

These horror-genre characters are not something that's available like Disney characters. So I had to improvise. I went online and downloaded photos of the fnaf characters and made a grouping of the photos.

I printed the grouping onto a piece of muslin using my little photo printer. I took the muslin fabric pieces and incorporated them into the travel bag. It turned out almost cute - I say almost because they are horror characters - ha ha!

Saturday

Barbie Travel Tote Bag

I modified a pattern I have for a travel bag in order to make it smaller. My granddaughters need travel bags to take on a plane. I wanted them to have bags that are small enough for them to carry themselves without them dragging on the ground.

My goal was also to limit them from taking too many items with them; maybe just their tablets and headphones, some gum and a snack, a stuffed animal and a light jacket. This little beauty turned out to be just the right size. Even filled, it is still light enough for a 5-year old to handle.

Thursday

Box Bag - Peppa Pig Tote

Peppa Pig Tote
I used this box bag tutorial to make a cute little Peppa Pig bag. The instructions were easy to follow however I did change how the lining is attached.

The instructions state to hand-sew the lining near the zipper but I chose to leave an opening between the contrasting fabrics and hand-stitch that opening.

I will make another bag like this and remember to take photos of how I did the lining for a clearer description.
Peppa Pig Tote

Friday

Star Wars Weekender Bag

Star Wars Overnight Bag
I finished my Star Wars weekender bag today. Even though the pattern I used stated that the bag finishes 16" wide, 15 1/2" tall and 6 1/2" deep I'm never really that good when it comes to determining what makes for a good sized item without the visual. Once I had this bag completed I could see that this is definitely a good sized bag!

The pattern is recommended for an intermediate sewer but I thought it was pretty easy. I did add a zippered pocket to the inside of the lining that was not in the instructions so I made it more complicated than need be.

The pattern called for a 22" zipper and I used a 24" zipper because I had it on hand and it was not an issue. There was no need to cut off the extra 2 inches because the bag pieces on both sides of the zipper were long enough to accommodate the extra zipper length.

I made this bag thinking that maybe my granddaughter might want it but she wasn't that thrilled with it. She is currently into Pokemon so maybe if I made another in that fabric she might like it more. I did make this as a sort of prototype. I want to make another using some sewing-themed fabrics to use for sewing retreats and sewing classes and maybe even a summer-themed bag for taking to the beach.

I really like this pattern. It's free and it can be found here. Because it really can be used as a weekender bag, I might look for another pattern in something a little smaller. At least I now have a visual reference so I will know what size I'd like to make next. And another great thing about this bag is that it is on my list of goals to complete in 2017 - so I get to scratch it off of my to-do list - yay!

Weekender Bag WIP

I'm starting the Weekender Overnight Travel Bag. The online tutorial for this bag comes with all the pattern pieces. I printed out the pieces, taped and cut them out so they are ready to go. The tutorial can be found here.

I still have to get some more heavy duty fusible interfacing and then I will be ready to do. In the meantime I can decide how I am going to lay out the pattern pieces.

I have enough Star Wars fabrics to make the bag but determining which fabric to use for each part of the bag is still in question. It's also the fun part. I can't wait to start cutting.

I have both white and black webbing for the handles but I won't know which one to use until I decide which fabrics are for the outside of the bag.

Pyramid Power Bag

Wisconsin Shop Hop Fabrics
I made this second version of the Pyramid Bag. After my first (upside-down) attempt, I just had to do one right. So I dug up some scraps and a matching zipper, and there we have it - a pyramid pouch where the fabric direction doesn't really matter so on that note, I guess I couldn't get it wrong this time even if I tried.

During the class I attended, we were supposed to make two versions of the pyramid bag; a larger one that's 12 inches wide and a smaller one that's 6 inches wide. I didn't get far enough along within the class time to finish the second bag. I had it cut out and interface applied but that was all.

Since I finished a new version of the larger bag, I thought I should finish the smaller one as well. Since there's no scale to these photos it is hard to tell but the smaller pouch is so very cute. I think I will definitely be making many more of these little ones. I absolutely love it.

Pyramid Power Bag Class

Three weeks ago I took a class called Pyramid Power Gift Bags. We were to learn how to use a Jelly Bean zipper in a funky shaped bag. The instructor was a school teacher who does sewing classes as a side-job. She was a very pleasant instructor with the right demeanor and temperament to teach us old-lady-set-in-our-ways quilters. (OK maybe that's just me I'm talkin' about!)

I liked getting some good instruction on when to use which stabilizer and how to make bags have lots of body. In this project we used different weight stabilizers in both the outside of the bag and the lining. It never occurred to me to do both.

I chose not to use a Jelly Bean zipper but instead use a Jelly Freedom zipper, where you cut the zipper to your specific length then add the zipper pull later. We were supposed to cut the pieces prior to class but I did not do that because my fabric is directional. I did not want to end up cutting everything sideways, if that makes any sense. 

Since the class was small, I worried needlessly about taking up the instructor's time just to get my pieces cut. I cut them during the class then waited for instruction to install the zipper. The instructor showed me how the zipper goes in and I stitched it down. Once I had it installed and top-stitched in place, I sewed the rest of the seams to complete the project. Only there was a problem...

The fabric was directional! I got it cut in the right direction but when I put the zipper on, I did it upside-down. Arrrgghh...Even though it was my fault, I do wish the instructor would have taken notice and mentioned that the finishing seam directions mattered. Oh well...it was a learning experience for everyone.
Pyramid Zipper Pouch

Monday

Poppy Bag

I made this book bag using the measurement I found from a free online tutorial. I would post the link here but I can't seem to find it anymore. But I promise that all I used were the measurements of the main bag, the rest was all me.

I made an exterior pocket on this bag and some interior ones as well. I also added a zipper closure. I liked the measurements because they fit a file folder and I plan on using the bag for my Legion paperwork.

I am on the board of directors for Unit 434 of the American Legion Auxiliary and it's best to keep thing organized. I picked up the fabric for this bag because of the pretty poppy pattern. Poppies are a central "theme" for the Women's Auxiliary so it made sense to use them in this project.

Wednesday

Shopkins Carry-All

I finally got some inspiration to use the Shopkins fabric I bought for my granddaughter.

We were at the store last week and she had some of her Shopkins with her. They are so tiny that she dropped them throughout the store. We had to back-track through the store to find them like tiny little breadcrumbs along our path.

Yes, they are very tiny. And today I found one in my sewing room. I'm certain she thinks she lost it. So I decided that she needed something to carry them in. Something that had a zipper closure so she would stop losing them. So I whipped up this bag for her to carry them in. They aren't cheap so I think her mother will approve.