Showing posts with label Tutorial. Show all posts

Sunday

Giant Hexagon Quilt

I finished the hexagon quilt today. I'm not sure what I will do with it now. It might become a charity quilt for church since I don't think it is cute enough for Quilts for Kids. Isn't this a great photo of the quilt via the pergola - ok it's really a great shot of just the pergola - haha!


I don't know what it is about the colors in this quilt, but I can't take a photo that does it justice. So I just want to mention that the free tutorial I used to make it is called the Giant Hexagon Quilt tutorial and you can find it here.

I brought my scroll saw up from the basement so I could cut out a dinosaur from a piece of wood we got at the Makers' Faire last year. There was a guy who had a full sized set up of Owen's Jeep from Jurassic World and he was dressed like Owen. My granddaughter is crazy in love with everything Jurassic World so it was fun to see her reaction to the display. The man was impressed with Chloe's extreme interest in everything he was saying so he gave her the wood with the dinosaur template on it. 

I cut the dinosaur out and hopefully I can convince her to get involved by sanding and painting it however she would like. Maybe she can draw more dinosaurs and we can cut them out together - that would be fun.

Thursday

Read With Me Quilt

Making this quilt has been on my to-do list for a very long time. It's from a free tutorial found at the Moda Bake Shop. If you want the tutorial, here is the link.

I finally decided to make it for a teacher at my granddaughters' school. We just love her and Teacher Appreciation Day just so happens to fall in April so it seemed like a good time to make it.

I used mostly scraps left over from other projects with a few new fabrics mixed in for color balance.

I didn't want the 'books' to be too bright and cheery. After all, books in a bookcase usually aren't very bright, especially if they are loved and used.

Making the letter applique was way easier than I thought it would be. I don't usually do this much applique on anything so I wasn't so sure what I was in for. And wouldn't you know it - easy peasy.

I used a totally different fabric not found in the quilt for the backing but I think it goes together pretty well.  I quilted it with a rainbow variegated thread so the colors would show up on the white background.

The quilt should have been gifted earlier this month but because of the pandemic, I don't know how or when we will get it delivered. Because of the quarantine, I took time off from finishing this to make masks. I'm happy that I still finished it before the month ended.

Sunday

Soup Bowl Cozies

I used a free online pattern and instructions to make these soup bowl cozies. They were a quick and easy project and I had so much fun making them. Originally, I was going to make two that matched and before I knew it, I had made four. They were so easy I think I will make some more and give them as gifts this year.

Making these was a great way to use up my long strips of cotton batting left over from quilts. There always seems to be a strip of batting as long as a quilt but only 15 inches wide. It seems so wasteful to just toss it, so these soup bowl cozies fit those scraps perfectly.

What a great way to use up some of those cute food-themed fat quarters I've purchased here and there. The tutorial I used can be found here.

Friday

Weekender Bag WIP

I'm starting the Weekender Overnight Travel Bag. The online tutorial for this bag comes with all the pattern pieces. I printed out the pieces, taped and cut them out so they are ready to go. The tutorial can be found here.

I still have to get some more heavy duty fusible interfacing and then I will be ready to do. In the meantime I can decide how I am going to lay out the pattern pieces.

I have enough Star Wars fabrics to make the bag but determining which fabric to use for each part of the bag is still in question. It's also the fun part. I can't wait to start cutting.

I have both white and black webbing for the handles but I won't know which one to use until I decide which fabrics are for the outside of the bag.

Thursday

Fussy Foldover Basket

I followed the Fussy Foldover Basket tutorial from Mon Petit Lyons' blog. The baskets looked cute and I thought they might be the right size to hold my scraps. My plan is to find the right size basket then make a bunch of them in different colors. Each basket will hold the scraps that pertain to the color of said basket.

I changed a few things from the tutorial. I pieced the fabric for the outside of the basket instead of using 1 piece of fabric. I made the the pieces 12" x 10" instead of 10" square. Instead of using fusible fleece, I chose to use leftover batting and I quilted the batting to the outside pieces of the basket. The original basket also has a pocket on the outside and I chose to exclude it.

Once finished, I pulled all my pinks and reds from my scrap basket. I loaded them into their new home. I thought this basket would be the perfect size but it turns out that all my scraps don't quite fit. The basket finished 7" x 6" wide and 7" tall. When the basket rim is folded over, it's 6" tall. It is definitely a nice size, but too small for my plan. I had to leave out the bigger scraps, they just didn't fit.

I really liked making this basket and I will probably make more, just not for holding my scraps. The original tutorial can be found here.

Monday

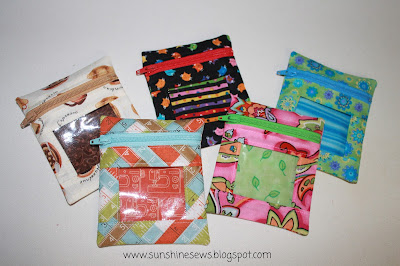
Mini Notions Bags

I've had the tutorial for a cute mini notions bag on one of my Pinterest boards for quite a while and today I thought I would give it a whirl. As part of my new year's resolution to try new things, this would qualify.

The tutorial used 4-inch zippers and I have a bunch of them leftover from another craft project. I buy all my zippers from ZipIt - an Etsy store that I love. The zippers are reasonable and the more you buy the cheaper they get so of course I bought way more than I needed. So I decided to try this tutorial and the largest piece to cut was 5 inches by 4 and a quarter inches. That meant using up scraps.

This may seem like a funny way to use up scraps but basically what I did was take out my 4-inch zippers and match the colors of the zippers to the scraps I had. I came up with many great combinations.

To make this project even better, while I was digging through my scrap bin, I found some leftover pieces of clear vinyl from an I-Spy project I did with some of my coworkers for an Alzheimer's awareness event. We made I-Spy bags for patients in nursing homes. It was a lot of fun and rewarding.

I cut the pieces out and made a few changes to the original tutorial from Simply Notable that can be found here. First of all, the original project used laminated fabric and I used quilting cotton. That meant I had a little more fraying to deal with so I zigzagged the edges after I sewed around the edges. Secondly, I butted a piece of lining fabric up against the backing fabric so there would be a liner inside the back of the little bag. That way when you peeked in the vinyl window, you would see the lining instead of the back side of the backing. Third, I didn't use a Teflon foot. It wasn't really necessary as long as I put my cotton fabric on top of the vinyl, there was no problem with sticking while sewing.

And that's about it. Aren't they cute?
Vinyl Window Zip Pouch

Wednesday

Little Girl Apron Skirts

Toddler SkirtI've been in the mood to make little girl skirts lately.  I have so many pretty little prints that I could probably make at least 20 different skirts.  However, in an effort to use up some leftovers, I've decided to try out a new tutorial using the leftover fabric from some baby quilts I made last year.

The skirt tutorial I found is adorable.  I love when tutorials have multiple sizes and since I have two granddaughters, that means I don't have to do any calculating myself to adjust a pattern. So I made a size 2/3T and a size 4/5T as a start.  I will have the girls try them on before I make any more just to make sure I have the right fit.

Here are the finished skirts.  They were quick and easy to make and I hope my granddaughters like them because I sure want to make plenty more. The tutorial for these can be found here.

Toddler Skirt

Tuesday

Trick or Treat Bags

I've had some Halloween-themed fabric hanging around my sewing room for ages. Since I wasn't sure how ready I would be to sew after my cervical fusion surgery, I didn't really plan on doing much of anything, let alone sewing. But lo and behold, I found the energy (either that or the Vicodin is working really well) to make something smaller than a quilt. I found these cute trick or treat bags and an online tutorial to go with them so I thought I would give them a try.

Halloween BagI dug out my Halloween prints and my fusible interfacing and got started on some trick or treat bags. The instructions were easy to follow and even though my lack of strength made it a little difficult for me to work with all that interfacing, I must say it was totally worth it.  These bags are exactly as described, they close up nice and when you open them up wide, the sides stand up nice. I can already picture how nice it will be for the people in my neighborhood to easily toss candy right into the bag.

I hope my granddaughters like them. Unfortunately, the fabric combinations look much better (like they actually go together) in natural light than they do in the photo. I found the tutorial for them here if you would like to make some too.

Wednesday

Fully Lined Zipper Pouches

Fully Lined Side Zippered Pouch
I made more of these zipper pouches in an effort to become comfortable with the process of getting zippers to fit correctly within a lined bag. Since I am a visual learner, I struggled with the instructions a bit because it really is difficult to get a photo of exactly how these things should go together. After making a bunch of these I think I finally got the process down.

Once I had a bunch of the correct size zippers, I went through my scraps in an effort to purge some of the cute fabric scraps.  I ended up cutting fabric for 11 pouches. Unfortunately, I ran out of the lobster clasps when I got to the ninth pouch so I will have to order more if I want to finish the rest of what I've already cut out.

I did learn that not all fabrics are great choices for these little pouches.  The fabric that shows above the zipper is exactly 1 inch, so if the print is too big you can't really tell what the image is. And if the fabric has text on it, because the back panel is folded to the front your fabric is going to be upside-down on either the front or back depending on how you sew the fabric to the zipper.

For the most part, they are pretty cute. I used the tutorial found here to make the pouches. The only change I made is that I added 1/8 of an inch to the sides of the pieces which allowed ease when sewing the side seams around the zipper.

Saturday

Zipper Pouches

I want to make some zipper pouches for an up-coming craft fair so I started testing out a variety of patterns and tutorials.  I've settled on the tutorial I found over on the Craftster blog. The instructions weren't difficult to follow and it didn't take very long to complete.

Once I finished my first pouch, I decided to make one a little larger just to be sure. The first pouch used a 6-inch zipper and the finished size is 5 inches x 6 1/2 inches. My modified one used a 7-inch zipper and measures 6 1/2 inches x 8 inches.

I do like the smaller original pouch better for this project so I'm going to start making many more. The link to the tutorial can be found here. As for the larger one, I think because there is no interfacing in them, they seem too weak to hold stuff. Maybe I will try a quilted version of this one sometime to give it more heft.

Quilted Scrap Fabric Basket

Sweetwater Noteworthy Fabric
Scrap Fabric Panel
 I have so much Noteworthy Fabric and I love it so much that I decided to make quilted fabric panels out of the scraps.  It feels good to use up the pretty scraps and it also gives me the opportunity to use up larger pieces of batting as well.

Using a quilt-as-you-go method, I created a large piece of quilted fabric to make a basket.  The basket measures 8" x 8" finished.  It is a decent size but not terribly large. I used tutorials I found here to make both the fabric panel and the basket.

I do love completing a project where I don't have to go to the fabric store for anything!

Scrap Fabric Basket - Noteworthy by Sweetwater
Scrap Fabric Basket

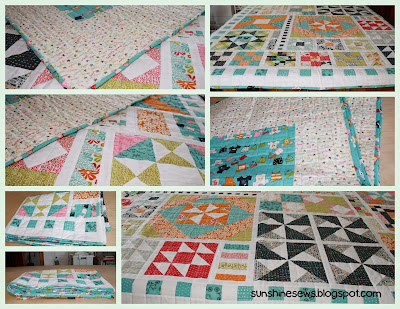
Jelly Roll Jam Quilt

Fat Quarter Shop quilt
I followed the tutorial from the Fat Quarter Shop to make a quilt called Jelly Roll Jam.  It was very easy and quick to make.  All you need is half of a jelly roll to complete.  It's a pretty small quilt which is partly why it's so quick to make.  I used a jelly roll from Sweetwater that I've had sitting on my shelf for a very long time.

The tutorial for this quilt can be found here. I really like the busy look and colors I get from this easy to make pattern and I look forward to making many more. With the right fabric, this would make a perfect baby quilt that can be completed easily in a day.
Fat Quarter Shop Pattern

Tuesday

Postage Stamp Quilt

Scrap Quilt
Postage Stamp Quilt
I decided to do some scrap busting over the holiday week. It seems that once Christmas Day has come to pass everything seems to come to a dead stop. Going from the hustle-bustle days of preparing for Christmas to having absolutely nothing to do is a very tough transition. So I thought I would take advantage of the post-Christmas, pre-New Years Eve time and do some cleaning in my sewing room.  It didn't take long to realize that I had lots and lots of scraps left over from the many quilts I made throughout the year. My scrap basket was overflowing with so many memorable and pretty fabrics that I thought I should try and so something with them.

While watching college football bowl games with my husband, I started to search for new quilt ideas when I came upon the postage stamp quilt by Red Pepper Quilts.  You can find her tutorial here. I quickly took my overflowing scrap basket and dumped it onto my sewing table and started ironing the pieces that were larger than the 2 x 7-inch strips necessary to make the quilt.  During two days of college bowl games - this is my measurement of time, I was certain my husband wouldn't miss my presence as long as he wasn't hungry. And sure enough, I had the peace and quiet to just cut and piece without any interruption. 

Once I had the top completed, I thought it would be difficult to decide on a backing and as I started to go through my stash, a large piece of pretty flowery fabric caught my eye.  It seemed to have most of the colors in the quilt somewhere in the tiny flower designs. Luckily I had enough to do the entire back. I quilted it with some straight line quilting and added chambray fabric for the binding which gives it an interesting contrast.  

I really like how this quilt turned out and I am so excited that I didn't have to buy a single thing to make it.  I even had two spools of variegated thread that went very well with the colors in the quilt.  So this is truly a scrap project and I love all 1,296 squares of it. 

Saturday

Aiming for Accuracy Quilt Project Completed

Quilting Gallery Quilt Along
Aiming for Accuracy Quilt Along Quilt
I joined in a quilt-along this summer and I actually completed all the lessons on time...well almost all of them.  I got to the very last border, a simple strip of Kona white and I just stopped working on it.  I had an obligation to finish another quilt project so I put it down.

When I put things down the momentum to finish just disappears.  With craft fair season and the holiday season coming, I had plenty of good arguments for putting this one aside. So now I have to admit that I am proud of myself. Here it is, just three days after Christmas and I finished it! I put the last border on, made the backing piece and quilted it on Thursday. I finished binding it yesterday afternoon, so really I finished it in two days but I didn't photograph it until today.

Oh crap! It doesn't have a label yet so I guess I am not quite finished after all. Gotta keep that momentum going.

Thursday

Recycled Denim Sack

Denim Bag
I was inspired by the lunch sacks made over at the inner child fun blog.  That version was made out of recycled jean pants legs and had an apple stamp on the added pocket. My version uses the recycled jean pants legs for the bag too but I used the little pockets tucked inside the larger front pockets of the jeans and sewed them on the front of the bags instead. They are pretty small but oh so adorable. The tutorial for the original bag can be found here.

Monday

Baby Burp Cloths

I washed some flannels and ultra cuddle fabrics and whipped up these baby burp cloths.  I wasn't really sure what a nice size would be for these things so I used the measurements from Made by Rae's tutorial.  The link to that tutorial is here.

Made by Rae Burp Cloth Tutorial
Baby Burp Cloths

Friday

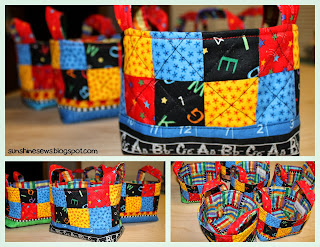
Quilted Teacher Gift Baskets

Teacher gifts
Quilted Teacher Baskets
I made a bunch of these cute quilted baskets as teacher gifts for my granddaughter, Chloe.  She has four teachers, but I made 6 baskets. I just never know if there will be that special someone who should get one of these so I figured a few extra wouldn't hurt.

I made these using a tutorial over at Pink Penguin's blog.  You can find the instructions here. It's easy to make and actually easier than what I did. I added the machine quilting over the blocks and the tutorial did not include that.  I also fussy cut the fabric that makes the bottoms, so I had to make the bottom piece a little bigger so I could cut it in half then put it back together so that the directional fabric was facing up on both sides.

I am not sure how we will fill them, but at least it's a start on the Christmas items for this year.

Tuesday

Recycled Denim Fabric Baskets

Recycled Denim
Now that October is here, besides fall, pumpkins, colorful leaves and cool weather, it's time to think craft fairs. Pretty soon it will be time to sell some crafts so I think I need to start concentrating on making more. It's been in the back of my mind, but now it's time to get moving.

I've had a stack of old blue jeans just waiting for something like this.  I used a tutorial I found on threading my way's blog to complete these. The link for the tutorial can be found here. These baskets went together quickly and easily so I will be making more later this month. It was fun to pick out the lining fabric and I think I can come up with many more ideas for the insides of these.

I hope I don't run out of old jeans.

A Tumbler Quilt

Thimble Ruler
Tumbler Quilt
I ordered the Thimble Ruler set a few weeks back in order to make this quilt.  I just love the Noteworthy collection from Sweetwater. So much so that I had enough fabric to make two quilts. Anyway, the size of the ruler allowed for pretty large pieces that would make each piece a focus piece. I followed the tutorial on the Riley Blake design blog and you can find the link for it here.

My new friend from Quilts for Kids, Renee let me use her AccuQuilt and the dies in order to cut the flowers for this quilt.  I also used some on the back.

I took some of the leftover fabric to make the panel on the back.  That happened by accident.  The truth is I cut the ecru fabric wrong.  It was supposed to be wide enough to go across the entire quilt and for some reason, I cut it way way to narrow. Therefore, I had to add some fabric to it and since I had to, I needed to make it look like I did it on purpose. So I cut the ecru fabric off center and spliced in the leftover Noteworthy. 

Just when I thought I was ready to put the layers together, I noticed the leftover flowers I had cut and it hit me at that moment that I should add them to the back for some consistency and continuity. I quilted along the edges of the tumbler blocks to add depth to each piece.

The Cinch Bag

The Cinch Bag
I've had this adorable fabric since last summer. It's called Unforgettable for Quilting Treasures and is licensed by Desilu, LLC for I Love Lucy & CBS.  The thing about that is I don't understand the connection. The I Love Lucy Show was about the antics of a housewife married to a Cuban bandleader.  The fabric itself reminds me more of something from a television show of the same era called 77 Sunset Strip. 

The colors are beautiful and the fun map and road sign fabrics are so very cute that it seemed like a no-brainer to make it into a bag.  And I've been wanting to make 'The Cinch Bag' ever since I saw it on the Sew Can She blog.

The problem is that I didn't know what I wanted to do with the fabric when I got it on sale and I really love the teal stuff more than the road sign print so I only bought 1 yard of the teal and a half-yard of the coral print. The Cinch Bag needs 2/3 yard of fabric for the bag and 1 2/3 yards of fabric for contrast.  The tutorial for the bag had all the parts out of contrast except for the main bag.  So how was I ever going to make this work?

Since I liked the teal best, I cut the main bag out of that first. Then I knew the casing should be the highest contrast so I cut that out of the coral print.  With not much coral print left, I cut the handles out of it.  There were supposed to be 4 pieces cut of the same fabric (inside handle, outside handle times two) but I did not have enough coral so I cut the 2 outside handles from the coral and the inside of the handles from the teal.  The ties were cut from teal since that was all I had left.  So now I am down to a 7-inch strip of coral print.  I decided that it could line the inside - all I had to do was add some other fabric for the rest of the lining since it wouldn't be seen (except by me) anyway.  So I grabbed a chunk of Kona white for the bottom of the lining.


Again, since it would only be seen by me, I did not change the thread color when I put the inside zipper pocket in.  So the blue thread really shows against the white. The tutorial for this is from Sweet Verbena and you can find it on her blog.  Here is the link.