Showing posts with label Recipes. Show all posts

Sunday

Summer Days

I love summer. It's my favorite season. I will spend afternoons napping on my hammock in the hot sun. It's one of my favorite places to be. I find it hard to stay in the house and do anything in the sewing room. And I struggle with deciding whether to attend sew days. Summers are short so I don't want to be indoors however, I love chatting with the ladies in my sewing groups. It's definitely a conundrum. Since it was supposed to rain, I did go to the Saturday Basement Quilters group sew day. I decided that that's where I will work on items for upcoming arts & crafts fairs. So I completed a bunch of flannel baby blankets and burp cloths while I was there. 

It felt good to get all of these done but it never rained. I would have rather been outside all day. 

Speaking of outside...

I was weeding my vegetable garden when I came across this:


Yes! That is a baby bunny. I am certain there are two babies nestled together, possibly three. I didn't want to disturb them too much so I spent very little time checking them out. They are hard to see as they are deep down under my lettuce patch but isn't that the point? 

My neighbors do this thing they call "Wine Down Wednesdays" where they invite all the neighbors to come and sit in their yard. All you have to do is bring a lawn chair and your own cocktail and you're welcome to hang out. It is great fun to sit and chat and it's a little something to look forward to each week. We have decided to make it an opportunity to try new cocktail recipes. This week we made Moscow Mules and wow, were they good.

Wine Down Wednesday

The recipe is so simple, just 2 ounces vodka, 1/2 ounce lime juice, and 4 ounces of Ginger beer. Just put the ingredients in a mug full of crushed ice with a slice of lime and a spring of mint. I didn't have any mint but I knew our hosts from WDW had some growing so they kindly gave me some mint. The drink was perfect and I will be making them more than this one time. Yum!


My roses are looking so lovely these days. I paid $3 for each rose plant at Wal-Mart and they are hardy and growing without much care.

Tuesday

What's on the design board?


This is how my design board looks. There's not much progress from last month. There's just too much summer going on, haha. The Button Collection is progressing as I expected.


It's been raining like crazy here so the creek looks like this.

Isn't it pretty? I love my backyard.


I've been experimenting with new cocktails all summer long. Since the pandemic, we don't go out to dinner anymore so I've had to become my own bartender. I've discovered a cocktail I really like. It's called the Pink Seniorita and it is delicious. 


Here is the recipe: 

Lemon wedge, for rimming glasses
Coarse salt, for rimming glasses
2 cups ice (I use crushed ice)
2 1/4 cups pink lemonade
1/4 cup fresh lemon juice
1/2 cup triple sec
1 cup tequila
4 lemon slices, for garnish

Rub a lemon wedge around the rim of 4 glasses, then dip rim into the salt.
In a pitcher, add 1 cup of the ice, pink lemonade, lemon juice, triple sec, and tequila. Stir to combine.
Pour the cocktail mixture over ice in each glass.
Serve with a lemon slice for the garnish.

I hope you enjoy it as much as I have. It's a refreshing summer treat.


Thursday

What's on the design board?

My design board doesn't have any new quilt projects on it except to say that the leftovers from the recently finished One Direction quilt are present. I want to make pillow covers with the orphan blocks and I'm just trying to figure out how to arrange them in a way to use them all up and make them look cute.

I also have some orphan blocks that I'm hoping inspire me to make more Lori Holt-Farm Girl-like quilts. They are a bit putzy so we shall see.

This last week was spent cleaning out my studio and it's amazing how inspired I was to start new things once that was done. I cut 2 new kits to take with me to the senior center sew days. Before cleaning things out, I just couldn't get inspired. I think it was the giant stacks of leftover scraps from other projects that were staring at me - clogging my brain. Ha!

Missouri Star Quilt Co Pattern

Missouri Star Quilt Co Pattern

This time of year is when I spend a lot of time gardening. The produce I get is never taken for granted. Gardening is hard work and I love the rewards Mother Nature brings. I used up the last of the snow peas that I picked in some garlic chicken. It's one of my husband's favorite recipes so there was none left when that dinner was done.

https://www.sunshinesews.com/2019/04/garlic-chicken-stir-fry.html

Monday

What's on the design board?

There's not much going on on the design board this month. Or last month really. Once summer comes it's hard for me to stay indoors. Plus my time has been hijacked because we are hosting a family reunion at our house in 2 weeks. That part is easy. The hard part is that my husband's brother, his wife, husband's sister, her husband, my son, and his fiancee are all staying at my house over the 4-day weekend during the reunion. That's a lot of entertaining and a lot of figuring out where everyone is going to sleep. It's a fun problem to have.

I am making slow progress on my gypsy wife. I have sections 1 through 7 completed and section 8 is on the design board. Plus a few extra blocks I made that I do not like. Don't know what's going to happen with those. 

Sections 1 through 7 are sewn together and now it's too long to hang on the design board. So here is the best photo I could get without having to lay it on the floor.

I made a chocolate ganache pound cake from a recipe I found on Pinterest. It was not great. It wasn't bad, just not good enough for me to make it again. It sure was pretty though. Click for the recipe if you care.

Thursday

Garlic Chicken Stir Fry

I love to make chicken fried rice. I love it so much I make it almost once a week. It's an opportunity to use up any vegetables in the fridge that are left from other meals or from me over-buying too much from the produce department at the grocery store. My husband who never complains when I cook loves it as much as I do. Last week he mentioned two other stir-fry dishes I occasionally make which leads me to believe he is getting tired of my stir fry but is too nice to say so.

So I tried a new recipe - garlic chicken stir-fry. The difference in this recipe is not so much the ingredients but the sauce. And it has cashews in it and who doesn't love cashews. When I try new recipes I make them exactly as stated. It drives me crazy when people will comment on online recipes about how they didn't like the recipe then state how they changed things up. I can't help but think that maybe if they followed the directions it would have been better. So I followed the recipe as stated and the results were fantastic.

It was so good I had to take a picture.

Here's the recipe:
Garlic Chicken Stir-Fry

1 tablespoon plus 1 teaspoon vegetable oil, divided
1 cup broccoli florets
1/2 cup julienned carrots
1 cup mushrooms, halved
1 red bell pepper, cored and thinly sliced
1 pound boneless, skinless chicken breast, cut into 1-inch pieces
salt and pepper to taste
4 cloves garlic, minced
1/4 cup cashew halves
3/4 cup chicken broth
1 1/2 teaspoons sugar
1 tablespoon soy sauce
2 teaspoons sesame oil
2 teaspoons cornstarch

1. In a large pan, heat 1 teaspoon oil over medium-high heat.
2. Add the broccoli, carrots, mushrooms and bell pepper to the pan. Cook for 5-6 minutes or until vegetables are tender.
3. Remove vegetables from the pan; keep warm.
4. Heat remaining oil over high heat.
5. Add chicken to the pan in a single layer and season with salt and pepper. Cook for 4 minutes per side or until chicken is browned and cooked through.
6. Lower heat to medium and add garlic and cashews; cook for 30 seconds.
7. Add the vegetables back into the pan.
8. In a small bowl, whisk together the chicken broth, sugar, soy sauce, sesame oil and cornstarch.
9. Pour the sauce over the chicken and vegetables and bring to a simmer. Simmer for 1-2 minutes or until the sauce has just thickened.
10. Serve immediately with steamed rice.

I don't think I will make any changes to this recipe, we like it exactly as it is!

Wednesday

Turkey Brine

I'm hosting Thanksgiving dinner this year and the best part about that is making some things my way. First of all, I love to brine the turkey overnight for the best results. I really think it makes a big difference.

Here's a photo of my brine cooking on the stove. I make it today so it can cool all day then tomorrow morning it will go over the turkey. That way the turkey can soak for 24 hours before roasting. The scent of the brine while simmering is amazing.


Here's the recipe I use (it's from Pioneer Woman):
  • 3 cups apple juice or apple cider
  • 2 gallons cold water
  • 4 tablespoons fresh rosemary leaves
  • 5 cloves garlic, minced
  • 1 1/2 cups kosher salt
  • 2 cups brown sugar
  • 3 tablespoons peppercorns
  • 5 whole bay leaves
  • peel of 3 large oranges
Combine all ingredients in a large pot. Stir until salt and sugar dissolve. Bring to a boil, then turn off heat and cover.

Allow to cool completely, then pour into a large brining bag or pot. Place uncooked turkey in brine solution, then refrigerate for 16 to 24 hours.

When ready to roast turkey, remove from brine. Submerge turkey in a pot or sink of fresh, cold water. Allow to sit in clean water for 15 minutes to remove excess salt from the outside.

Discard brine. Remove turkey from clean water, pat dry, and cook according to your normal roasting method.

Friday

Pavlovas

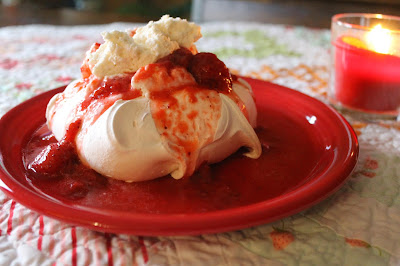
Schaum TorteWe went strawberry picking last week and I realized that I needed to do something with the strawberries I did not freeze. They were sitting in the fridge and I worried about them getting too soft.

I've always made strawberry pies, jams or shortcakes but I really wanted to try something I never made before. I remembered a wonderful dessert I had at a restaurant during winter called Schaum torte. I've never had it until that day but my husband just raved about how his grandma used to make it for their Sunday dinners during his childhood. How lucky.

I found a recipe online for Pavlova. It looked exactly the same as the Schaum torte I had eaten except that the Schaum torte was piped into a nest shape and the Pavlova was just dolloped into its shape but flattened out in the middle to look like a nest. I had to give it a try.

As you can see from the photo, it was a great success. I had to make a strawberry topping that was similar to pie filling bit a little thinner. Freshly whipped cream was the perfect addition to make it exactly as in the restaurant. All I have to say is that this recipe is a keeper. And it wasn't terribly complicated, in fact, I had all the ingredients at hand - no special trips to the grocery store!

Individual Pavlovas with Cream Cheese Whipped Cream and Raspberry Sauce

Yield: 8 to 10 servings
Prep Time: 35 minutes
Cook Time: 1 hour
Total Time: 2 hours 40 minutes

Ingredients

  • 1 1/2 cups granulated sugar
  • 2 tsp cornstarch
  • 6 large egg whites
  • 1/4 + 1/8 tsp cream of tartar
  • 1 pinch salt
  • 1 tsp vanilla extract
  • Fresh mint , for garnish (optional)

Raspberry Sauce

  • 3 Tbsp sugar
  • 2 1/4 tsp cornstarch
  • 18 oz fresh raspberries (frozen would work too)
  • 1/3 cup water

Cream Cheese Whipped Cream

  • 8 oz cream cheese
  • 1 1/2 cups heavy cream
  • 1 Tbsp granulated sugar
  • 1/2 tsp vanilla extract

Instructions

  1. Preheat oven to 250 degrees. In a mixing bowl, whisk together sugar and cornstarch. In the bowl of an electric stand mixer fitted with the whisk attachment, whip egg whites with cream of tartar and salt on medium speed until soft peaks form, about 3 minutes. Increase speed to medium-high and slowly add in sugar mixture (I just continuously added 1 heaping tbsp at a time one right after the other), then increase speed to high and whip until stiff glossy peaks form, about 5 minutes, adding in vanilla during last minute of mixing.
  2. Spoon and dollop meringue into 3 to 4-inch circles (depending on how large you want them) onto parchment paper lined baking sheets then use the back of the spoon to create slight dips in their centers. Bake in preheated oven 60 minutes, then leave in oven with door closed, turn off oven and allow to rest in oven 45 minutes. Remove from oven and allow to cool completely.
  3. To assemble, top meringues with Cream Cheese Whipped Cream then Raspberry Sauce and garnish with mint. Assemble just before serving.
  4. For the raspberry sauce:
  5. In a medium saucepan, whisk together sugar and cornstarch. Stir in 1/3 cup water. Add half of the raspberries, then cook mixture over medium heat, whisking constantly until mixture has thickened. Remove from heat and cool completely. Stir in remaining raspberries. Store in refrigerator in an airtight container.
  6. For the cream cheese whipped cream:
  7. In a mixing bowl whip heavy cream until soft peaks form then add sugar and vanilla and whip until nearly stiff peaks form. In a separate mixing bowl, whip cream cheese until light and fluffy. Add cream cheese to whipped cream mixture and whip until stiff peaks form. Store in refrigerator.

Thursday

Canning Pickles from a Crock

This year's harvest has been overwhelming. I cannot seem to keep up with all the wonderful vegetables.

Today I canned pickles. I put them in the crock 5 days ago and could not wait to get to this point. What fun!

I used my neighbor's pickle recipe. Every year he brings me a jar of his pickles and they are a family favorite. I mentioned to him that this year I was going to try his recipe.

We cut pickle slices and spears and with 50 pickling cukes, ended up with 7 quart jars and 1 pint jar of finished pickles. It was so fun and easy that I think I will make another batch.

I certainly wouldn't want to run out over the winter.


Saturday

Fruit Salad Sangria

1 bottle moscato (750 ml)
4 ounces strawberries, hulled and halved
1 orange, thinly sliced
1 peach, pitted and sliced
1/2 cup freshly squeezed orange juice (1 large orange)
2 tablespoons freshly squeezed lemon juice (1 large lemon)
16 ounces club soda

In a large pitcher, combine wine, strawberries, orange, peach, orange juice, and lemon juice. Refrigerate at least 4 hours or overnight. To serve, pour over ice and top each drink with a splash of club soda.

Sunday

The Best Stewed Tomatoes Ever

My garden is just bursting with San Marzano tomatoes. I can pick an entire bowlful every day. Today I decided to gather them all up and make some stewed tomatoes.

I cleaned and blanched 126 tomatoes. After removing the peels, I hand-squeezed all the tomatoes into a pot, added a green bell pepper I picked from my garden and cut a bunch of parsley from my herb garden.

I love it when I can make an entire recipe with all the ingredients grown right in my backyard. The amazing thing is that I can pick another 100 tomatoes each week. And I look forward to having them keep coming for as long as possible.

The recipe can be found here.

I was surprised that all those tomatoes made a grand total of 8 pints of stewed tomatoes. I am happy to have this task completed and look forward to the next batch...I think I will be making some salsa next time.

Friday

More Cheese Making

For my second attempt at cheese making I used a recipe called Super Easy Basket Cheese for Children. I had a spare gallon of raw milk that I had to use very soon before it expired. I could have froze the milk but I really didn't want the stress of knowing I had to eventually use up the frozen milk. I just wanted to use it while it was still fresh. I also kept the whey from my first batch of cheese. Some articles I read about cheese making stated that adding the whey made better cheese. So for this batch I used a gallon of raw milk and a quart of whey.

My first cheese making experience made me much more confident for this time. I poured the milk and whey into the pot and turned on the heat. I also added a teaspoon of salt right off the bat. My first batch was not salty enough. I wanted to fix that. So as the milk cooked I prepared the bowl for the curds and got ready to scoop them out. I got the baskets cleaned and ready - no cheesecloth this time! I have the real cheese making equipment!

Once the milk reached 86 degrees I added the rennet, stirred and turned off the pot. I waited minutes to find perfect curds. I turned the pot back on while removing the curds from the whey. I filled the basket to the very top. I squeezed and squeezed until more whey came out. After a few hours, I removed the cheese from the basket and put it in the fridge.

By dinner time the cheese was ready and we had it as an appetizer before dinner. It was squeaky like cheese curds when biting into it. It was fantastic. Much better than the first batch. I can't wait to try another recipe - it sure is fun to make this wonderful food from scratch.


Raw Milk Cheese

I've been dying to make some cheese ever since I took a cheese-making class a few years ago. I've always wanted to make raw milk cheese; it's said to be the best kind of cheese to make from scratch. The problem is that raw milk is not sold in my state and I just never took the time to go somewhere else and get it. But finally I acquired some raw milk this week. Since it isn't easy to come by around here I was very happy when I got 2 gallons of this wonderful stuff.

As for recipes to make cheese, I can't remember where I put the ones I got when I took the class. And I wasn't that ambitious to look through all the files of recipes I've acquired over the years so I thought I would surf the net to find a recipe. I remembered the basic steps in the cheese-making process so I knew what I was looking for.

I found the perfect recipe here. I had all the ingredients and equipment necessary to make the cheese so I got to work on it this afternoon. I even came across a book on cheese-making in my library but the recipes in it were way more complicated than what I learned in the class so I think I will save the book for a time when I have more experience at this.

I followed the recipe I found on the internet however, it says to add whey. I didn't have any because I haven't made any cheese as of yet. Since the whey was listed as optional, I just ignored it. I heated my milk with a low flame and waited for a while to check the temperature. As long as the outside of the kettle didn't feel warm, I figured I had time before testing it.

The thermometer got to 86 degrees and I turned the stove off. I added the 13 drops of rennet and stirred it in. This is where I was unsure what to do next. The kettle has to sit for 45-60 minutes while the curds form, but it's supposed to stay between 80 and 90 degrees while it sits. I was worried that it might cool down too quickly so I turned the oven on in order to keep the stove warmer. After checking the temperature of the milk 3 times in 2o minutes I realized I was worrying for nothing. The kettle is such a nice thickness that it was holding the heat in nicely.

It took over 60 minutes to get a clean break on the milk. The recipe I used had a link to the explanation of what a clean break is, but the link was broken. So I used this YouTube video to learn what a clean break is. I cut the curds into chunks then turned the stove back on to get the temperature back up to 100 degrees. Even at a low heat, it literally took less than 5 minutes to get up to 100.

I placed the curds into a bowl and added the salt. The recipe called for 2 tablespoons of salt which made me nervous. I used one and a half tablespoons of salt. It was not enough. Follow the recipe!

I ended up with a large bowl of whey. And once I strained the curds, there was more whey only this time it was full of salt. I ended up mixing the whey that had the salt in it with the whey that was plain. I'm not sure that's how it was supposed to be done...oh well.

I stuck the whey back into the milk jug and put it in the fridge. I will use it in my next batch of cheese. I took my ball of cheese and pressed it between two plates with a heavy LeCreuset pot on top to weigh it down.  I must say, this stuff does taste good. I can't wait to serve it on Easter Sunday and see what everyone else thinks.

Thursday

Pickles, Tomatoes and Peppers!


It's been such a hot summer and my garden is thriving because of it. The tomatoes just keep coming as well as the peppers and the cucumbers.

I made pickles using many of my cucumbers and when I was done I still had more cucumbers left. It is amazing how much produce I get from a few plants.

This year I thought I would try brussels sprouts. They grew on these giant stalks and I had to pick them off one-by-one. It was hard work but they are a wonderful addition to my garden.

I also sliced green bell peppers and jalapenos and put them in the freezer for winter.

One of my favorite things to do with my harvest is can salsa. This year I blanched tomatoes all summer long and I have 4 gallon ziploc bags full of tomatoes in the freezer. I also made a case of salsa with the fresh tomatoes.


I still have carrots and cabbages growing and plan on canning jalapeno carrots and making spring rolls from scratch. I also have been picking raspberries all summer long. Once I have enough in the freezer, I will make more jam.

What a wonderful year!

Cold Pressed Iced Coffee - What a Treat!

Iced Coffee
I decided to learn how to make iced coffee. It sounds easy enough; coffee, ice cream and some whipped cream on top. How complicated is that?

After some research I found out it's not as easy as I thought. There is a process called cold pressing that must be done to get the right stuff for iced coffee. Cold pressing involves mixing a pound of coffee with 2 quarts of water and letting it steep overnight.

Once 24 hours goes by, you just take the sludgy mixture and pour it through a cheese-cloth lined strainer. That required some patience and a desire to have more than 2 hands. It was a bit messy as I tried to squeeze all the liquid through the cheese cloth. My hands were covered with the coffee grounds and it was a struggle to keep from getting the grounds into the pressed coffee but I got it done.

On a side note, a few years ago I purchased 5 yards of cheese cloth, took it home and washed it in the dish sink by hand with a drop of Dawn dish-washing liquid. After it soaked, I rinsed it thoroughly twice to get the soap out. After it was dry, I stored it in a Ziploc bag to keep it clean. So I was comfortable using some of the clean cheese cloth for this purpose.

The recipe I used for this said to put a teaspoon or two of sugar in a mug with some ice and pour the pressed cold coffee over the top. Mix it up and add half and half. Well, I don't drink my regular coffee with sugar, just cream. So I thought I could drink this stuff without sugar and boy, was I wrong! You see, the cold press process ensures that the coffee is stronger, a little more bitter with much more caffeine still in the coffee. I had to give in and add some sugar. I stirred it up, added some whipped cream and a straw and it was well worth the wait.

I could tell there was more caffeine in the iced coffee; I had a bit of the jitters after I finished it. It was fantastic. I also took some of the mixture and made ice cubes out of it. I thought it would compliment the coffee on these hot days. And luckily it stores for a month so I can enjoy the coffee for the entire hot month of August. What a treat!

Saturday

Banana Bread

http://www.foodnetwork.com/recipes/banana-bread-recipe.html?soc=sharingpinterest
Banana Bread
I found a great banana bread recipe on Food Network's website.  I read the reviews for it and I have to say,  I get annoyed by what I read sometimes in those reviews. Some of the people who reviewed the recipe stated that they changed the ingredients to something totally different or added more or less than what is called for and then they gave the recipe a bad review. I wonder if it ever occurs to them that their version sucked because they didn't follow the recipe! I just don't understand.

I do have to admit though that I followed the recipe exactly and found this banana bread perfect. It wasn't all crusty and dried out like other versions I've tried. It was moist and very flavorful.  I think it was the cinnamon which is something I don't remember ever using in other recipes and the fact that you have to make sure you don't overbeat the batter. However, I did wish it had nuts. So this time I made it and added a handful of chopped walnuts.  To me, it did make the banana bread better.  So if you like nuts, that is the only suggestion I have to complement this recipe. So I did change things but not not until I tried it exactly as printed. :-) So here is the wonderful original recipe from the Food Network website:


Banana Bread
  • 1 cup granulated sugar
  • 8 tablespoons (1 stick) unsalted butter, softened
  • 2 large eggs
  • 3 ripe bananas
  • 1 tablespoon milk
  • 1 teaspoon ground cinnamon
  • 2 cups all-purpose flour
  • 1 teaspoon baking powder
  • 1 teaspoon baking soda
  • 1 teaspoon salt
Preheat oven to 325 degrees. Butter a 9 x 5 x 3 - inch loaf pan.
Cream the sugar and butter in a large mixing bowl until light and fluffy. Add the eggs one at a time, beating well after each addition.
In a small bowl, mash the bananas with a fork. Mix in the milk and cinnamon. In another bowl, mix together the flour, baking powder, baking soda, and salt.
Add the banana mixture to the creamed mixture and stir until combined. Add the dry ingredients, mixing just until the flour is incorporated.
Pour batter into prepared pan and bake 1 hour to 1 hour and 15 minutes. Set aside to cool on a rack for 15 minutes. Remove from the bread pan and invert onto rack to cool completely before slicing.
Spread slices with honey or top with ice cream.


If you want to see the original recipe, just click here.

Sour Cream Coffee Cake

I have been on hiatus since my spinal fusion surgery two months ago.  I have tried to sew some things however, my ability to bend is so very limited that it is more frustrating and painful than relaxing and rewarding. I did have the energy to make a coffee cake today. Having energy these days is a rare thing so I have to take advantage when I can. My husband will be thrilled, it's one of his favorites and since he has been taking such good care of me, it feels good to do something nice for him.

Sour Cream Coffee Cake


Here is the recipe:

Sour Cream Coffee Cake
1 cup butter
2 cups white sugar
2 eggs
1 cup sour cream
1/2 teaspoon vanilla extract
2 cups all-purpose flour
1 teaspoon baking powder
1/8 teaspoon salt

Filling
1/3 cup all-purpose flour
1/2 cup packed brown sugar
2 tablespoons melted butter
1 teaspoon ground cinnamon
 
Heat oven to 350°. Grease a tube pan.

In a large bowl, cream together 1 cup butter and white sugar until light and fluffy.  Beat in the eggs, one at a time, then stir in the sour cream and vanilla.  Mix in 2 cups flour, baking powder, and salt.  Spread half the batter in the prepared pan.

Prepare the filling: In a medium bowl mix 1/3 cup flour, brown sugar, 2 tablespoons melted butter, and cinnamon.  Sprinkle cake batter with half the filling.  Spread second half of batter over the filling, and top with remaining filling.

Bake 50 to 60 minutes in the preheated oven, or until a toothpick inserted near the center comes out clean. 

Enjoy!

Monday

Raspberry Jam

Raspberry Jam Recipe
Today I made some raspberry jam.  Over the course of the spring and summer I pick raspberries from my back yard. I have a little raspberry patch on the south side of my house and they are plentiful. Usually I get a harvest 2- 3 times per season. When they are ready, I pick the ripe ones daily, wash them and put them in a Ziploc bag in the freezer.  By the end of the season I end up with so many raspberries in the freezer, they get in the way.

Since today is the day of the deep freeze (it was -17 degrees here in Oak Creek), I am not going anywhere and it feels like a good day to heat up the kitchen. So I thawed the raspberries and made some jam. Here is the recipe I used, however I had to increase the ingredients by two hand a half times due to the large amount of berries I had. I ended up canning 20 jars of jam.

Raspberry Jam 
2 quarts raspberries, washed and drained
1/3 cup water
1 teaspoon lemon juice
1 tablespoon grated lemon peel
1 package pectin
6 cups sugar
Combine raspberries, water, lemon juice, lemon peel, and pectin in a large pan. Bring to a rolling boil over high heat, stirring frequently.  Add sugar, return to a boil. Boil hard for 1 minute. Remove from heat and let set 5 minutes. Spoon off any foam that may be on top. 
Ladle into sterilized jars and process in a hot water bath for 10 minutes. 

Raspberry Jam


Thursday

Vegetable Spring Rolls

Spring Rolls
I love spring rolls. Especially ones I make from scratch. It allows me to put in more of the ingredients I like and take out stuff I don't like.

The tough thing about these is that it is a little time-consuming. There's making the filling, then letting it cool. Then rolling up the filling in the spring roll wrappers. Then there's the cooking part. I deep fry these on my stove which can be a little messy but oh so worth it. They are that good.


VEGETABLE SPRING ROLLS

  • 1 - 2 tablespoons peanut oil
  • 2 cloves garlic
  • 5 - 6 green onions, chopped
  • 2 cups carrots, grated
  • 2 cups cabbage, shredded
  • 1 cup pea pods, thinly sliced
  • 2 cups bean sprouts, chopped
  • 1 tablespoon cornstarch
  • 1 tablespoon water
  • 2 - 3 teaspoons sesame seed oil
  • 2 teaspoons soy sauce
  • 12 spring roll wrappers
  • 2 teaspoons cornstarch
  • 2 tablespoons water
  • 4 cups corn oil for frying

Heat wok over medium heat, adding one tablespoon of oil. Sauté garlic about 1 minute, add green onions, carrots, and cabbage and stir fry for 3 minutes. Add pea pods and bean sprouts, cover and cook about 2 minutes. Combine 1 tablespoon of cornstarch with 1 tablespoon of water and add to pan along with the sesame seed oil and soy sauce. Cook and stir until mixture thickens. Remove from heat and allow to cool completely.

Separate spring roll wrappers and cover with a damp towel to keep moist. Combine 2 teaspoons of cornstarch with 2 tablespoons of water. Working with one wrapper at a time, wet the edges with the cornstarch mixture. Place 3 tablespoons of the vegetable mixture in the center of the spring roll wrapper and roll up diagonally, tucking in the edges.

Heat the corn oil in a wok to 375° Working in batches, add spring rolls and fry until golden for 1 minute. Remove from oil and serve hot with plum sauce or a mixture of rice wine vinegar and soy sauce for dipping. 

Saturday

Garden Cabbage and Vegetable Beef Soup


Garden Cabbage
I love gardening just about as much as I love sewing.  Both produce such rewarding results. Every year I try to plant something new and different in my garden.  This year the new includes cabbage and the different includes tomatillos. It hasn't been a very warm summer so I'm not sure when I will see tomatillos, however the cabbage is doing great.  As you can see from the photos, my first head harvested is a very nice size. 
So it's time to make some soup. Between my garden and the farmers' markets, I have some beautiful produce and there's nothing like a nice vegetable beef soup for a light supper. This is an easy recipe and since the soup doesn't take much more than an hour to make, the vegetables are still firm, preserving their fresh taste. I serve it with some nice artisan bread.

Vegetable Beef Soup
  • 2 tablespoons olive oil
  • 1 pound beef stew meat, cut into small cubes
  • 3 large carrots, peeled and chunked
  • 1/2 large onion, diced
  • 4 garlic cloves, diced
  • 2 small bay leaves
  • 4 cups beef broth
  • 1 14-ounce can diced tomatoes in juice
  • 3 cups coarsely chopped cabbage
  • 2 small Yukon Gold potatoes, peeled and diced
  • 1 cup frozen corn kernels
  • 1 cup frozen peas
Heat 2 tablespoons oil in a large pot over medium-high heat.
Sprinkle beef with salt and pepper. Add beef to pot; sauté until outside is no longer pink, about 4 minutes.  
Add carrots, chopped onion, chopped garlic, and bay leaves. Sauté 5 minutes.
Add the beef broth, tomatoes with juice, cabbage and potatoes. Bring to a simmer.

Partially cover the pot and simmer until beef and vegetables are tender, about 50 minutes.
Stir in corn and peas; simmer until tender, about 5 minutes.
Season to taste with salt and pepper.

Vegetable Beef Soup