Wednesday

Battlefield Quilt WIP

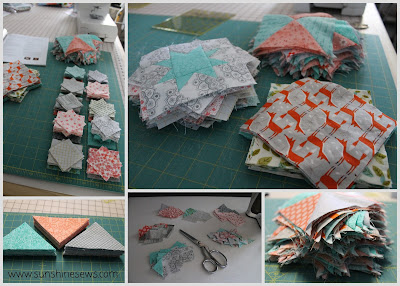
I've been collecting teal, salmon and gray fabrics for quite a while. I love the color combination; it is soft and pretty and soothing. Last fall I pulled them all out wishing I knew what I wanted to do with them. Without finding much quilt pattern inspiration, I just let the fabrics sit on the bottom shelf on my sewing table.

Then during the Christmas holiday I was paging through one of my pattern books - a Civil War Reproduction pattern book when it hit me. My teal-salmon-gray stack would make a great modern version of one of the patterns in the book! The book is called The Blue and the Gray by Mary Etherington and Connie Tesene. I have all of their books. They have always been my favorite quilt makers and I have used quite a few of their patterns in the past.
I started to sort and stack the fabrics based on the requirements in the book and I had more than enough to make the entire quilt. I was so energized, it took me very little time to cut out all the pieces. In less than two days, I am ready to lay out the pieces. There is only one little hiccup - my husband had right rotator cuff surgery and his care will come first. I am sure I will get some sewing done while he naps!
The Blue and the Gray Quilt Book

Saturday

The Christmas Season

The Christmas season is so full of wonderful events. There was Breakfast with Santa at the Legion post, my granddaughter's Christmas program at school, and of course, Christmas. I thought I would post a few photos of the events that took place throughout the month.
American Legion Post 434 Oak Creek, WI
Breakfast with Santa

Chloe's Christmas Program

Everybody gets a Kindle Fire from my mom!

Christmas!

Monday

Craft Fair Items

I am certain that my sewing days are finished until after Christmas. So I thought I would post some photos of items I had for sale at the craft fair.

Wednesday

Charity Quilts Delivered!

Now that the craft fair is over I can concentrate on the holidays. The first thing on the agenda is taking the quilts that my church group made over to the local VA hospital. I packed them up and got them ready for delivery. As usual during the Christmas holidays, my Legion group's holiday party fell on the same date as the quilt delivery. Many times there are choices to be made, which is a nice problem to have, so my husband went to the VA with the American Legion Riders group and I went over to the Legion post for the party.

My husband returned with a few photos of his visit. The ALRA always visits the long-term ward at the hospital and he was happy to report that much of the ward was empty. So that gave him the opportunity to spend some quality time with the families that were there. I was so glad that he could hand all of them out.
 

Sunday

Zipper Pouch Stockings

Christmas stockings
I used Jennifer Jangles' free zipper pouch stocking pattern to make these little cuties. They were fun to make although I did realize the need for more little embellishments. Sometimes I do think I spend way too much time digging through ribbons and trims to figure out what to use in some of my crafts.
I've been trying to be more organized and keep track of where I keep things so that has helped to keep me from wasting too much time looking for things. However I do realize that I have a way to go to total organization.
Christmas stockings

Thursday

Toddler Scarves

My granddaughter's school is holding a craft fair next Saturday and I agreed to rent a booth. I really didn't plan on doing any craft fairs this winter but I think the decision is keeping me on a creative high. Although when I'm only a month into using my new machine, I'm not so sure about the timing. I guess it's trial by fire, as the saying goes.
I attempted to make some toddler scarves using some novelty fabrics I've had in my stash. I lined them with some flannel to make them soft against a little one's skin. The first two I gave to my granddaughters to test them out. So far, they seem to be just about right. So I made a few more. I hope they are a good seller.

I cut the fabrics 8" by 42" and added some rick-rack for embellishment. It was quick and easy sewing.

Tuesday

What's on the design board?

Toddler ScarvesAs December starts rolling in, all I can think about is the upcoming craft fair I committed to do. I am just realizing that it might have been a bad decision. Even though I want to help my granddaughter's school raise money, December is not the time to have to concentrate on anything but the holidays at the end of the month. Unfortunately for me, I am not all that good at multitasking so I doubt I will get much Christmassy stuff done until after December 12th. But who knows...my mood could change tomorrow and I will feel more motivation. Let's hope!

With that said, my design board contains some fabrics I cut out to make toddler scarves. They will be cutesy on one side and solid flannel on the other. I also have some leftover Minion fabric and I thought I would try something patchwork-like - although I'm not sure if it will be a baby quilt or maybe even another toddler scarf!

I also signed up for a paper-piecing class and I decided to do one block in advance of the class. That does seem a little silly, however, I really wanted to make sure I selected the right fabrics for the project. Not to mention, I hate feeling totally inept when taking a class. So I figured a little practice would not be a bad thing.

Monday

Just Four Fun Quilt - Completed

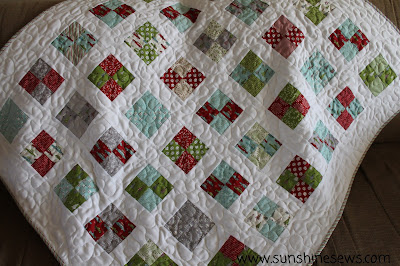
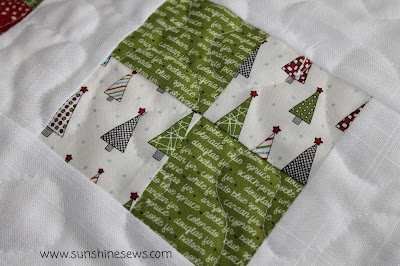
I used Amanda Jean Nyberg's Just Four Fun pattern found on Craftsy for this quilt. The fabrics are from Sweetwater's Holly's Tree Farm collection and they make a nice holiday quilt for this season. I thought I would experiment with using linen for the sashing, borders and backing. I feared that the quilt might be heavy from the weight of the linen but it was not heavy at all.

Just Four Fun
The linen was quite a find. A friend from church mentioned that she was cleaning out her aunt's house to hold an estate sale and there is a room just filled with fabric. She invited our church quilt group to come to the sale a day ahead of time to purchase the fabric for a dollar a yard. I was definitely interested so I went to the sale. I found tons and tons of nice cottons but unfortunately most were not my style so I passed on them. Then I noticed a table just filled with linen fabrics. The entire table was heaping and most of the fabrics were in 7 - 8 yard cuts. I was in heaven. I piled all the neutral cuts of fabric up to purchase. The pile was so heavy I was worried that I wasn't going to be able to lift it! When I went to pay for my selections, I told my friend that I was certain I had at least 45 yards of fabric, she looked at the stack and said, "How's five dollars?" OMG! I offered her more but she refused so I got a wonderful stack of linens for close to nothing. I promised her they would not go to waste.

So this was my first opportunity to use some of the linen and even though it shredded a bit during the piecing process, it turned out beautifully and was not difficult to work with. Tomorrow this quilt will be in the Elna show at my local quilt shop. This is the first quilt I made with my new Elna machine.
Just Four Fun Pattern by Craftsy

Saturday

Black Saturday

I did not plan on doing any Black Friday shopping. I was successful in that endeavor. Then came Saturday morning. It was 5:45 am when my husband asked me if I was heading out to any stores. I think he secretly loves Black Friday but he will never admit it. After all, he came home yesterday with tons of "deals" he found as he went out and about. I told him no, I was not planning on doing any shopping at all.

I don't know why, but I thought Joann Fabrics opened at 6 am today. After I told my husband I was not going shopping, he mentioned that I told him that quilting fabrics were 60% off which is very rare. And that's why he figured I was going to head out today. Like I said, he secretly likes shopping so I think he is disappointed that I don't enjoy it like he does. Then a funny thing happened...I looked at the clock and it was now 6:04 am and I got this crazy panicky feeling and a big sense of regret.

I hopped in the shower and told myself to get over it, there will always be another sale. I got dressed and headed back downstairs for breakfast and took out the newspaper. There was that darn Joanns flyer staring at me. As I looked at it I realized that the top of the Saturday page stated that the stores open at 9 today! I did not miss the sale at all. In fact, I am dressed and ready. As my resolve to stay home faded away, I got in the car and headed out just in time to be the third person in the door when they opened at 9. None of the other shoppers were after the quilting cottons so I had first pick.

It was a nice relaxing shopping experience, in fact everyone in the store was cheery. After having my giant pile of fabric cut, I perused the store for a very long time. After all, a deal is a deal. So here is my new stash items along with a $5.99 iron. I figured I would use that iron for fusibles. Even with using the protective pressing paper, sometimes I get goo on my good iron. Now maybe I can keep that iron cleaner.

Wednesday

Blessing of the Quilts

Tonight at church we had a quilt blessing at the beginning of the service. It was wonderful to hear our pastor speak about the work we do and the effect it has on those in need. We placed the quilts on the chairs in the church so people could sit and lean back on them. There were many comments about them and it felt really heart warming to get all at positive feedback. I would have loved to take photos during the service but that would be rude so I took these shots half an hour before church began.


Now that the service is over we will sort them and my husband's Legion group will take some over to the VA Hospital as part of their Christmas visit and the rest will go to a local homeless shelter. I am already looking forward to next year and making more.

Saturday

Plus Sign Low Volume Quilt - Completed

Plus Sign QuiltI made this plus sign quilt using low volume fabrics for the background. I like the way the background has movement due to the various shades of the soft grays and beige.

I used charm squares as well as some yardage to make the 5-inch blocks found in the background of the quilt. The plus signs are made from fabric scraps.

Monday

Quilts for Kids - Superman Tipsy Tumbler Quilt

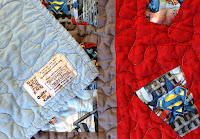
Quilts for KidsI made this quilt using a piece of Superman fabric I got from the Quilts for Kids stash. I really wanted to keep the scenery in tact so it tells a story. So I chose to make it look like something like a film reel. However, the pieces of fabric weren't all that wide but they were long so I had to improvise to get to a nice lap size.

I chose to take some of the Superman fabric and make tipsy tumbler blocks by fussy cutting the Superman figures from the fabric. I found the instructions for the block on the Missouri Star Quilt Company website. They are a great source of inspiration for quilting. The tumbler blocks went together very quickly and easily. In fact, they were fun to make.

I backed the quilt in a light blue fabric I found in my personal stash and free-motion quilted it for a quick finish.
Tipsy Tumbler Blocks

Thursday

Scrap Quilt Challenge Winner!

I entered a scrap quilt challenge a few months ago and I won a prize. I entered my wonky stars quilt since it was a perfect fit for the requirements to enter. So today I got this package in the mail.

I know I should be grateful for the prize but I have to admit, I do not like batiks. I tried to like them. I've made project with them but I just can't seem to get to a place where I want to work with them.

Actually I am grateful that I got such a generous gift however, I will have to find a way to pay it forward to someone who will love it and enjoy using it. I thank the person who donated this to the scrap quilt challenge. I do appreciate the acknowledgement.

Monday

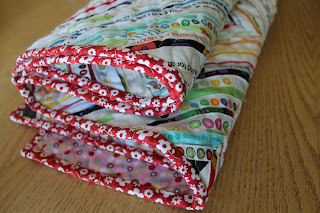
Selvage Quilt

My first free-motion quilting project on my new machine is my selvage quilt. I made the top a few months ago and I wasn't sure what I was going to use for the back. I recently went to the fabric store and picked out some fabric that I was sure would be perfect (without taking the quilt top with me) and of course when I got home, it was a terrible match.

Just as I folded up the fabric and placed it on my shelf, I noticed a stack of new fabric I forgot about. I went to a clearance sale last week and bought some fabrics for my stash. Some were so deeply discounted that I bought enough to make quilt backs. Lo and behold. the piece on the bottom of that stack looked like a perfect match!

I pulled out the fabric and laid it on the quilt top and I was right this time. It was just what I was looking for. So after pinning the layers together, I quickly got started on my first FMQ project on my new machine. I did have to read the instructions on how to wind a bobbin first. I discovered a really cool feature; since I was using a different color thread on the bobbin, I could leave the thread loaded on the machine and wind the bobbins without changing the thread out. What a wonderful feature!

Sweetwater fabric binding
Once I got started, it only took me just a little over an hour to finish quilting the piece. Then I chose some leftover Sweetwater fabric from my stash for the binding and completed the project.


I tried to photograph the quilt outdoors but it was too sunny to get a nice shot. However, I did get a great shot of the fall colors on the tree in front of our house.

Saturday

The Elna 680

I have had my Husqvarna Rose sewing and embroidery machine since 1997. That is a long time. As my machine started to age which I only noticed each time I had to bring it in for repair, I started to look at other machines. That is an overwhelming thing. There are so many machines that offer so many different features that I realized I needed to pay attention to the things I like about my machines as well as the things I didn't like. It's been two years since I started that process. I also started a wish list of the things I would like my next machine to have. The funny thing is my wish list wasn't all that long. I wanted a bigger throat space and the knee lifter. That's it.

My Rose is an embroidery machine. It has the hoops and the software for making various embroidery designs. I used it twice. Yes, twice in 18 years. That is not a good return on the investment. I hope my husband doesn't read this; he bought me the machine and it was not cheap. I did use the many embroidery stitches on the machine when the kids were growing up and I made their clothes and the girl's dolls' clothes. But after I quit garment sewing there was no need for all that.

Lately my Rose requires more intervention. In order to make it work smoothly, I have to let the machine warm up. If I don't, the thread sensor beeps constantly driving me crazy. I could take it in for repair again but it's starting to get costly. It is time to get a new machine.

Introducing the Elna 680. It is a machine designed for quilting. It has a larger throat space and the knee lifter for the presser foot. If you ask me it still has too many stitches but that's not the end of the world. The machine was reasonably priced, unlike my Rose so it won't take me long to get the return on my investment.

I can't wait to get started on my next free motion quilting project to try it out.

Monday

Quilts for Kids - Comic Book Quilt

Quilts for KidsI had a piece of comic book fabric from the Quilts for Kids donated fabric stash. It wasn't big enough to make a large quilt out of so I had to do some creative sewing to use it in a quilt. I decided to try a shadow box quilt and just make bigger sashing around the blocks in order to make the quilt a decent size.

There are plenty of free shadow box tutorials online so I just plucked one from the internet and made as many blocks as I could. I could only get 12 ten-inch pieces from the fabric. There were two smaller strips left over so I cut as many squares out of it as I could until there was nothing left.

Because this fabric was not directional, I lost track of which end was up. So I made a really huge mistake. Half the blocks are right-side up and the other half are up-side down. The 'shadows' should all be on the same sides! Unfortunately, I never noticed...not even when I was free-motion quilting it. It came to my attention when I took the photos. So it was way too late to make any correction. Oh well.
Quilts for Kids

Sunday

What's on the design board?

Tipsy Tumbler QuiltThe other day I was perusing the Missouri Star Quilt Company's website. The ladies at my QfK meetings rave about their site and have used many of their free quilt tutorials to make donated quilts. I instantly wanted to make at least 5 quilts from the free patterns I saw.

The thing about my donated quilts is that sometimes I have a piece of fabric without a pattern. The size of the piece will dictate the quilt pattern. That was the case with the Superman fabric piece. I really wanted to showcase the scenery in the fabric and still do something creative.  Enter the Tipsy Tumbler free tutorial!

I cut the larger piece into sections that I will border with some narrow sashing in gray. Then I fussy cut the tumbler blocks out of the narrow fabric piece I had left. I sewed them into a red block that goes well with the large piece of focus fabric. I want to use the tipsy tumbler blocks as a border around the larger pieces. I have to make a few more tumbler blocks before I can lay it out but the process is going rather quickly so it won't take me long to get this quilt top done.


Friday

My Little Pony Masks

I hadn't planned any Halloween projects this year. And then I came across some really cute masks on Pinterest. They were adorable. I knew my granddaughter would love them. So there was no way I was going to skip Halloween projects after all.

The beauty of this project is that there are plenty of free patterns online. Although some of the cuter ones were for sale, I could still take the free ones and alter them so that they would be cuter too! I downloaded two versions of the masks. Coincidentally, Jo-Ann Fabrics had felt on sale; 3 for 99 cents - what a bargain! Just what I needed to make masks.

I printed the downloaded templates and cut them out. I wanted some better stitching on the masks so I had to figure out a way to make them thicker. I ended up creating a bigger base piece to sew the hair and horn on. After I finished the first mask I decided to make another. On this one I tried to "free-hand" stitch the eyelashes. That turned out to be a bad idea. Oh well...good enough for a one-time use.
My Little Pony Mask
Pinkie Pie Mask


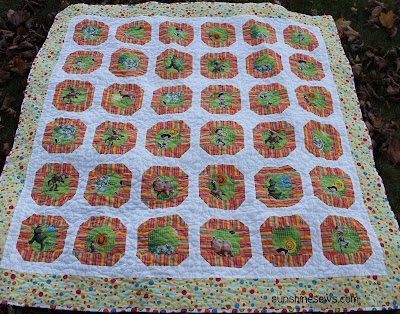
Quilts for Kids - Toy Story Quilt

Dottie Quilt - Quilts for KidsI used the Dottie pattern by Cluck Cluck Sew to make this quilt. The only thing I did differently is that I have one less row than what the pattern called for. I was working with donated fabric and I wasn't certain how many blocks I would get. I ran out of the orange-striped fabric after the 36th block which meant I was going to have 6 rows of 6 blocks instead of 7 rows. So in a way, it worked out pretty good.

I used the rest of the Toy Story fabric on the back to tie together the forest green backing with the colors in the focus fabric.

The quilt was free-motion quilted. I really like this technique because it looks good and goes very quickly. It does use a lot of thread though so I have to remember to wind plenty of bobbins before I start. This was a fun pattern and I am certain I will use it again.
Quilts for Kids

Quilts for Kids

Sunday

Weighted Pin Cushion and Thread Catcher

I wanted to make a thread catcher for my travel machine. I decided to use the instructions from Elizabeth Hartman's tutorial over on her blog, OhFrannson. The thread catcher also has a weighted pin cushion to hold it in place.

I used some cute fat quarters I picked up at my local quilt shop, Elmwood Fabric Gallery and I keep a ziploc bag full of scented rice in my sewing room for just such projects. I couldn't wait to get started.

The project took me less than two hours to complete. It probably would have been even quicker if it weren't for the hand-sewing parts. I always seem to be a bit putzy when it comes to hand-sewing. I like how I can detach the basket part from the pin cushion for easy storage in my Tutto bag. And I like the little pockets to hold my scissors. Here is the link to the tutorial I used.


Thursday

Meet Ruxin

This is our new kitty, Ruxin. We rescued him from the shelter just today. So far he seems to be adjusting very well to his new home. He is four years old, which apparently makes him less desirable as an adoptee. Personally, I prefer them past the kitten stage so he's perfectly fine for me. I am so glad he picked me out to be part of his life today.

He doesn't know it yet, but he will be spending a lot of time in this room. 

Tuesday

Quilted Baskets

I received a request to make some quilted baskets out of really fun fabric. It has film rolls all over it. Some of us see this as nostalgic however it isn't... yet. In fact, I think the photos taken with film are so much better than the digital ones we take now. Although I am sure they would be better if I weren't printing them out on my crappy little color printer. But I digress...


The fabric is so bright and cheery that I decided to quilt it with some nice yellow rayon specialty thread. They are lined in simple black fabric and look like little soldiers all in rows. I did my best to cut as many of these baskets out and I got to 11 before I ran out of fabric. All that was left was one small 2" by 10" strip once I was done. I think they are very cute.

Wednesday

Quilts for Kids - Patchwork Quilts

Daisy QuiltI've been practicing some free-motion quilting lately. Since I have some quilt tops done for a charity group, I thought I would take the time to get even more practice in by quilting these finished quilt tops using the free-motion technique.

Once I finished the first quilt, I was addicted. I was pleasantly surprised how quickly I could get the entire quilt done. So I free-motion quilted the second quilt as well.

I think I will be doing a lot more of this technique. I know I need more practice but what better way to get more practice than by quilting more projects!
Capset Quilt

My Ironing Station

The end of summer is a perfect time to get painting projects. It's when the weather is perfect for the paint to dry. So it is time to get some projects done!

I've had an old entertainment center from the 80's stored away for a very long time. It held a large-screen television which meant it was a bulky piece of furniture with a fat opening for those big, heavy televisions that were so popular back in the day. That entertainment center is made from oak and the craftmanship is beautiful. It is a quality piece which is why we could not part with it. Unfortunately, we could not use it anymore either. Those flat-panel tvs we have today just don't fit.

We were going to turn the piece into a wine rack. My husband would custom-fit some bottle racks where the tv was and we would use the shelves for storing wine glasses. So I put the piece in the kitchen until I could decide what color to paint it and I absolutely hated it there. So it was on to plan B....an ironing station for my sewing studio.

Ironing StationI measured the space available in my sewing area where I thought it should go and it was a perfect fit. And as for color, that was easy - I have leftover paint from the shelves I painted so I used that. I then had my husband cut a piece of wood a half-inch smaller than the top of the unit and covered it with layers of batting and insul-bright. I topped it off with a white duck cloth cover and there you have it - an ironing station.

Even though painting is cutting into my sewing time, I am having tons of fun re-purposing our old furniture. I even did some stenciling on the inside for a little charm. Then I added a curtain rod and made a curtain with some fabric I bought at Ikea and changed the door and drawer hardware to something a little more modern. I absolutely love it.
Ironing Station


Thursday

Batik Wall Hanging

Connie, the owner of Coins & Quilts put together a wall hanging kit for her shop. The kit uses a pattern called Autumn Leaves by Thimble 'N Thread and is made up of batik fabrics. I made a sample wall hanging from the kit for her to hang at the shop.
Thimble N Thread Pattern
I used Madiera thread to do some stitching around the appliqued leaves and just a little straight-line quilting around the blocks, like the pattern designer suggested. I was pleasantly surprised how the sample turned out, especially since I'm not usually a fan of batiks. 

Tuesday

What's on the design board?

I changed up some of my low volume blocks before sewing them together. Some of the fabrics I thought would qualify as low volume turned out to be a bit too busy for my purposes. So I did some un-sewing and replaced the offending fabrics with some quieter stuff.

Now that I have the blocks sewn together, I'm thinking that I should make the quilt top bigger. I really started with no plan other than to dabble in low volumes. And now that I've gotten this far, I really like where things are going.

It will be fun to pull out a few more scrap pieces to make more blocks. Other than this quilt top, I haven't been doing all that much sewing. I have too many outdoor projects in the works to spend my days indoors but I do miss my sewing machine!

Plus Sign Quilt

Thursday

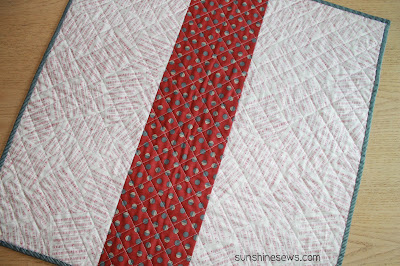
Wisconsin Shop Hop Fabric Table Topper

My sister-in-law and brother-in-law are die-hard University of Wisconsin Badger football fans. To top it off, their son played the tuba in the Badger band. That made their Badger football experiences even sweeter. So needless to say, I'm pretty certain their favorite song of all time is the University of Wisconsin theme song, "On Wisconsin".

This year's shop hop fabric line has a print with sheet music that says "On Wisconsin" on it. And although the fabric colors are a little muted from the University of Wisconsin colors of red and white, it seemed obvious to me that I had to make something for my sister-in-law out of this fabric line. Since she is coming to visit at the end of this week, I figured I better get started.

Since I work at a local quilt shop, I decided to take their free shop hop block and turn it into a table runner. I bought the last quilt block kit at the shop and added some extra yardage to it, especially the sheet music print. I thought a table runner would look good on either their coffee table or their dining room table and it would make a nice conversation piece when people looked at the print up-close. I hope she likes the finished product.
Wisconsin Shop Hop Tablerunner

Wisconsin Shop Hop Tablerunner

Tuesday

Re-Purposed Television Stand

I've been doing very little sewing lately. The thing is, it's the weather. Wisconsin summers are way too short so you have to savor every moment of every nice day. At least I think I do. With that said, I maximize my outdoor time with gardening, weeding, taking long walks and using the garage as a workshop.

The garage is the perfect place to paint during the spring, summer and fall depending on the humidity and the extreme in high and low temperatures. Here in Wisconsin in spring and fall the daytime temps can be perfect however the nighttime temps can fall below 40 quite often. That's not good for drying paint. It can also get well over 90 in summer during the day. Again, not good painting weather. So when those perfect days to come, I get busy.

I decided to start with an old television stand that my daughter was storing in my basement. It had a nice large cabinet that sat low to the floor with a brace that was attached to the back of the main unit. A flat-panel television bracket was attached to the wooden brace. It was a hideous looking thing made of a very dark veneer.

After reading a few articles on painting over veneer, I thought I would write about my experience. I started by taking the wooden brace off the back of the main unit. Then I removed all the hardware; the knobs, hinges, drawer slides and pretty much anything that was screwed on to the main piece. I even removed the glass from the doors so I could paint the doors easily without worrying about getting paint where it does not belong. I purchased a gallon of Zinsser Bulls Eye oil-based primer. This stuff is noted for its ability to cover any surface without sanding and I was all about not sanding.

I put a coat of primer on the piece and let it dry overnight. The next part was the hard part. Choosing a color. I've been obsessed with the teals and blues lately so I chose a pretty color called North Haven and I purchased a quart of Dutch Boy Kitchen and Bath semi-gloss enamel paint. This stuff takes a long time to dry, but I would rather have a quality coat of paint than a quick coat that comes off when you bump into it.

The paint went over the primer like a dream. It covered so well, I didn't have to give it a second coat. Although, I did miss a few spots...an occupational hazard of painting in a not-so-well lit garage. While the piece was drying I took the hardware into the back yard and spray painted it with some metallic silver paint. The hardware was originally a dark brown that matched the color of the veneer but now with my blue paint, the hardware needed an upgrade as well. The only problem I had was that one door knob was missing so I had to buy two new knobs for the doors. At least I had the drawer pulls and the hinges all in tact. I waited until a sale at the hardware store and I purchased two glass knobs for the doors.

After a few days, I put the hardware back on and moved the piece into the house. The only trouble I had with getting it back together is that the glass did not want to slide into its groove as easily as it came out. I think the extra layers of paint had something to do with that so I just took a scraping tool and ran it along the groove that the glass sat in and that fixed the problem.

Over the weekend while the newly repurposed television stand that I now call a bench was drying, my husband went on a day trip to do some wine tastings. We just happened to find a quilt shop along the way and I had to stop. As I was rummaging through the clearance fabric section, I came across the prettiest little print with beige and blue flowers. It really looked like the blue I chose for my new bench. So I bought 3 yards of the fabric.

When I got home I was amazed to find that the fabric had the exact same blue in it as my paint. I was thrilled. I knew I had a piece of upholstery foam in the back of my closet left over from an outdoor furniture project I did years ago. I wondered if the foam would be the right size for the bench. It sure would be nice to think that I kept that leftover foam all these years for good reason. When I took it out, it was a little too wide and not quite long enough to go end-to-end but it would still work. I was going to get a nice cushion for my new bench at minimal cost!

I cut off the extra 3 inches from the width of the foam and got out a bunch of leftover quilt batting. I placed 4 layers of quilt batting over the foam and put a few basting stitches in the layers to hold them in place. Then I made a muslin cover first, just like a pillow cover. The muslin would be the lining for the bench cushion and the template for the cushion cover as well. Once the muslin cover was done, I slipped the foam and batting into the muslin and sewed the opening shut. When I made the cover from the flower-print fabric, I inserted a zipper into the side seam so the cushion could be removed and the cover will be washable.

The cushion very nicely sits on the new bench, like they were made to go together. I love re-purposing pieces like this. The only problem I have now is that I don't need it. Good thing I have a son who just bought a new house. I think this will look nice in his currently empty home!

Entertainment center makeover


Thursday

My Little Pony Valances

My Little Pony CurtainWith the completion of my painting project (the purple bedroom for my granddaughters), I am ready to work on the fun stuff. I am starting with valances for the windows. I have had a stash full of My Little Pony fabrics just for this occasion. So with a freshly painted purple room, I chose the most purple-ish of the pony fabrics to make the valances. I lined the insides with muslin so they would have more thickness and body to them and also to make them less see-through.

Once I got the valances done I couldn't wait to get some new curtain rods and hang them. I also wanted shades for their room. It seems like I spent the entire summer cleaning the blinds in my house so I thought my daughter would appreciate the shades over blinds as well. As luck would have it, our local hardware store just happened to have wall decals on sale for half-price at the same time I was purchasing curtain rods. I used that opportunity to buy some My Little Pony decals I've had my eye on for some time. They are so cute but a little on the expensive side so the only way I was going to get them was on sale. Perfect timing!
My Little Pony Curtain

My husband happily hung the new shades and the curtain rods on the windows and all I had to do was put up the valances and stick the decals on the walls. Since I wasn't sure where the furniture was going, I thought it was best to put the decals above the windows. They certainly would not be hidden behind tall furniture there!

I am happy with the results and I can't wait until my granddaughters see their new room. They have no idea we've been upgrading their new room. It will be quite the surprise.

Monday

My Little Pony Pillows

My daughter is moving closer to us. She has until the end of August to get the move completed. Since she is going from an apartment to a townhouse, she now has the freedom to paint and decorate the rooms as she sees fit.

I volunteered to help her. That actually translates to I want to paint my granddaughter's new room purple and decorate with My Little pony stuff. She was happy for the extra help.


I purchased 2 gallons of Dutch Boy Dura Clean Satin paint in the color, Prairie Sky. I love this color. It is just the right shade of purple to meet my granddaughter's obsession with the color of Twilight Sparkle a.k.a. the purple pony. So I painted the ceiling white and then the walls. I was totally surprised when I only had to use 1 coat of paint. Even though the can did say it was primer and paint in one, I just never believe that claim. That meant I have way too much paint...a whole extra gallon. I predict many purple paint projects in my future.

After I painted, I made the girls some valances from 3 yards of My Little Pony fabric I purchased last year. I also made a banner to hang in their room. As soon as I have those things hung I will post about them here.

The leftover fabric went into making these two pillow covers. Each one has two pockets so the girls can put their little goodies in the pockets. They were so thrilled when they saw them. I was hoping to save them until they see their new room all done but I just couldn't wait.